C-Swipe: An Ergonomic Solution To Navigation Fragmentation On Android

Email Newsletter
Weekly tips on front-end & UX.
Trusted by 200,000+ folks.


 Register!
 Flexible CMS. Headless & API 1st
There are 3,997 different Android devices. Your navigation should work with all of them. C-Swipe can help: It is an alternative navigation pattern for tablets and mobile devices that is novel, ergonomic and localized.
This article provides a detailed walk-through of the design and code and provides a downloadable mini-app so that you can try out C-Swipe to see whether it’s right for your app.
Size, Complexity Increasing
The number of touch devices is increasing, with new devices and features being introduced daily. If we look at recent Windows OS developments, one clear trend is that touch devices are getting larger. Already, the lineup includes 12-, 15- and 21-inch touchscreens and touch-friendly applications are becoming more complex and full-featured, now including standard Microsoft Office apps optimized for touch. And if the latest 12.85-inch Chromebook Pixel with its 2560 × 1700 touchscreen display is any indication, Google is likewise serious about integrating touch into larger hardware for serious computing.
It’s only a matter of time before Android OS is forced to catch up; however, scaling the current Android 4.x action bar scheme may not be realistic or ergonomically desirable for all applications or device types.
I’m proposing C-Swipe as an alternative navigation pattern, based on the natural ergonomics of the human hand. C-Swipe can be used to bring up a contextual menu anywhere on the touchscreen by swiping the thumb in a natural semicircular arc along the surface. This gesture is roughly in a shape of the letter C when executed with the right hand — hence, the name of the pattern (the gesture is called a “reverse C” when executed with the left hand).
Content Is King
Imagine the entire surface of a mobile or tablet touch device being devoted to content. To use the functionality or navigation, the user would swipe the screen with their thumb in a natural semicircle gesture anywhere on the device. They could make this touch gesture while holding the device comfortably and securely with two hands, while the device is flat on the table, while reading in bed, or in any position and orientation they choose. That’s because all they need to do is swipe the screen with their thumb.
The swipe of the thumb causes a semicircular contextual menu to display. When the menu comes up, the most commonly used function is on top, near the final position of the thumb. Icons and text for the menu are positioned where they will not be blocked by the thumb. The user taps the item they want, and once the action is performed or the screen is tapped anywhere outside the menu, the menu would disappear.
Easy To See, Yet Hard To Reach
Flipboard is an elegant app that has gained legions of loyal fans through its gorgeous UI and effective use of content as navigation. Yet, on Flipboard’s detail pages, some options — “Back,” “Favorite” and “Like” — are located in the top action bar:
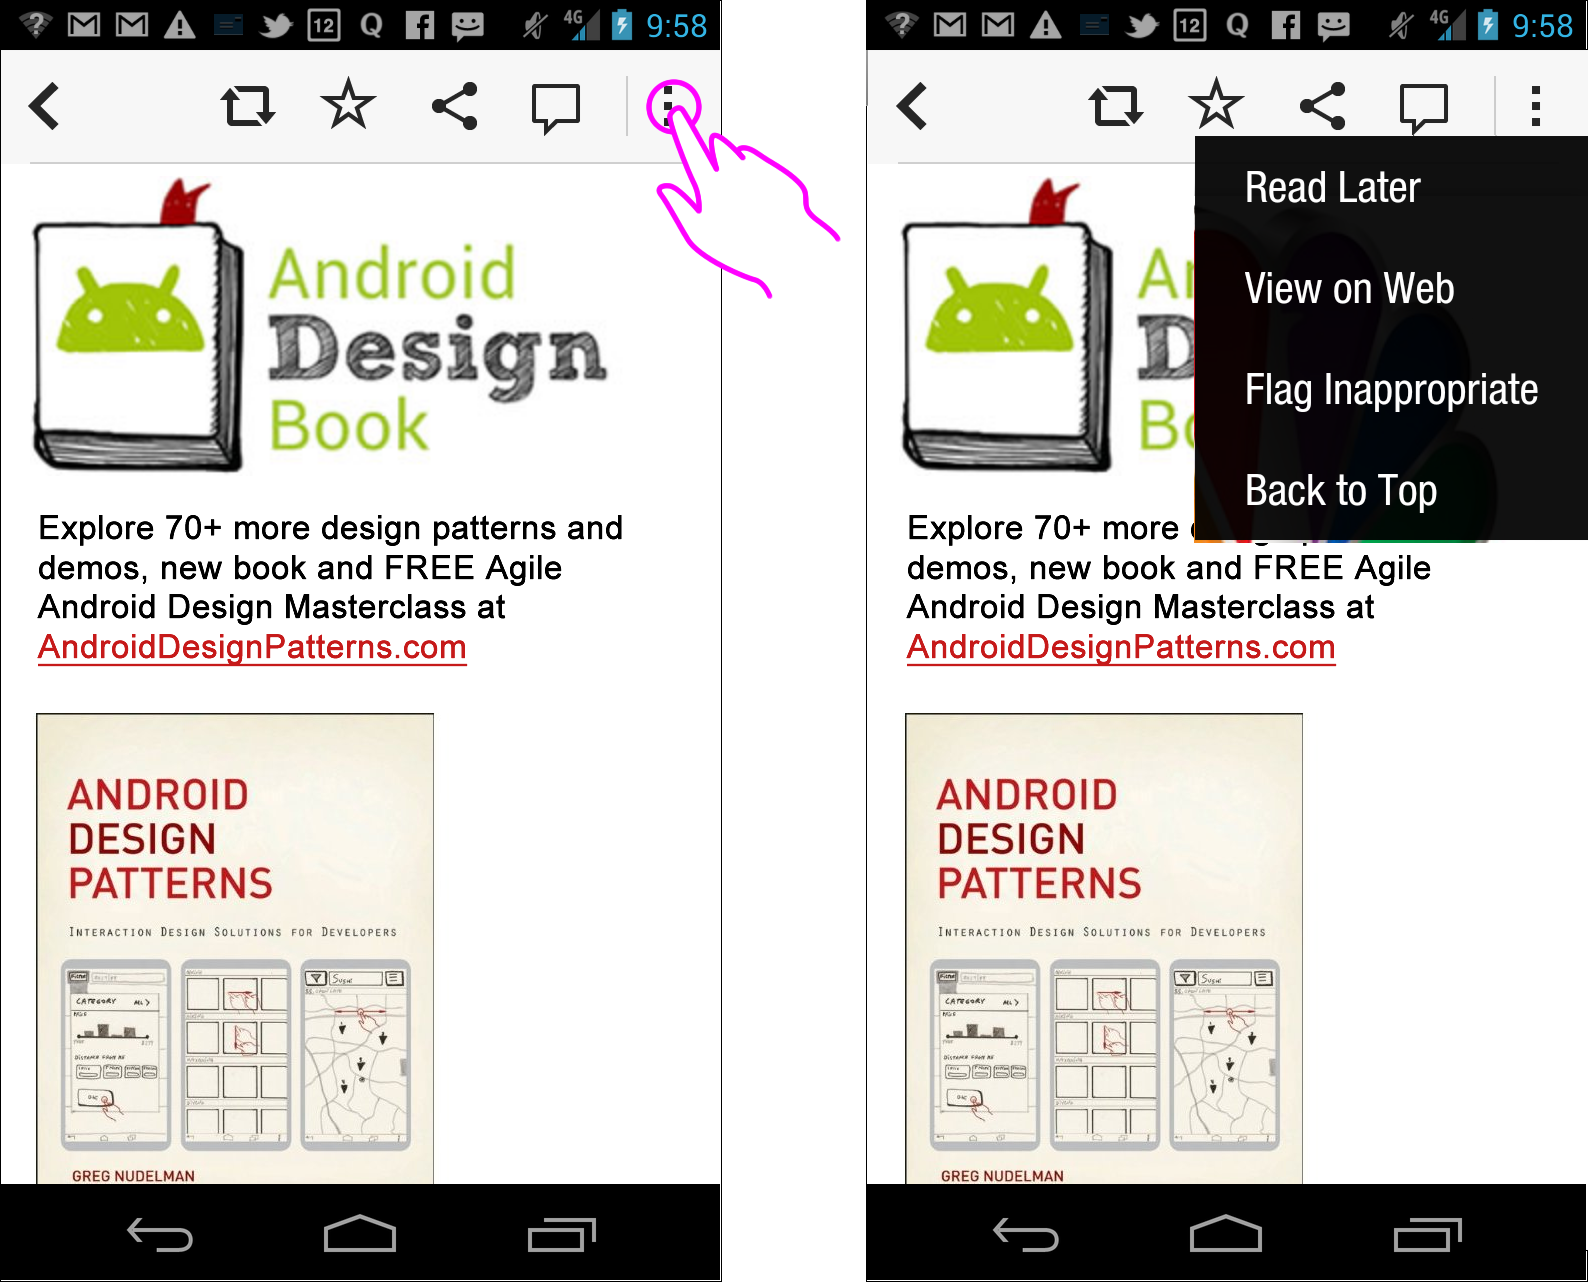
Fig. 1: The Flipboard app for Android 4 places action buttons in the top action bar. Larger view.
The top action bar is a popular location for navigation and functionality in Android 4 and is recommended in Android 4’s design guidelines. The top bar facilitates the discovery of functions: it presents them for easy viewing at the top of the device, where they would never be covered by the user’s hands.
Yet placing the actions at the top of the screen is a double-edged sword: reaching the top bar on many devices is difficult. Even on small mobile devices, reaching the top bar requires awkward juggling. Larger devices, such as the popular Galaxy Note, require full use of the second hand to tap the buttons, making both multitasking and relaxed casual use more difficult.
The action bar also takes up important space at the top of the screen. The visible functions serve as an effective learning aid while the user is learning the app. Unfortunately, as soon as the user learns the functions, the bar’s visibility becomes a distraction, taking up precious space in the most visually active place on the screen.
Navigation Anywhere
What if there was a way to devote 100% of the screen to content, while allowing the user to effortlessly call up a functional menu from anywhere on the device, wherever their hand is, and provide direct access to all options without any awkward gestures or juggling? That is exactly what C-Swipe does:
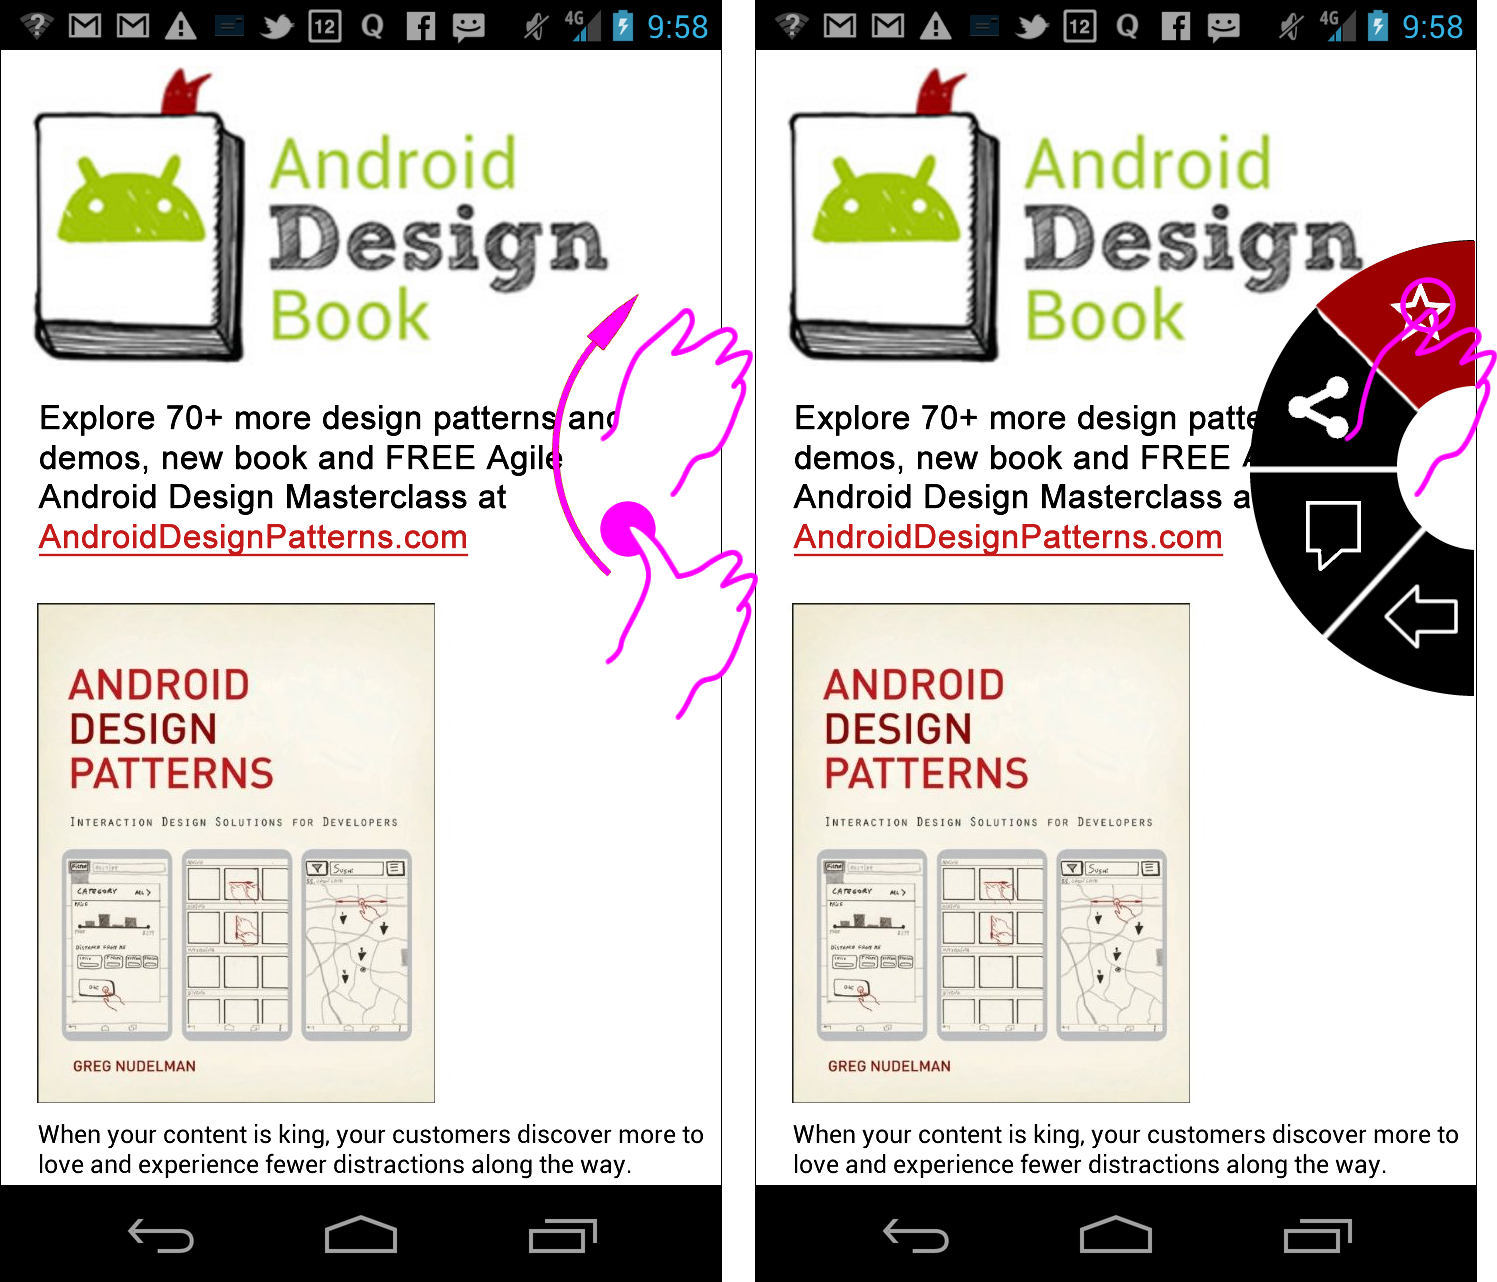
Fig. 2: In this redesign of the Flipboard app, the user makes a swipe-and-release gesture to bring up the locally accessible contextual navigation. Larger view.
A semicircular swipe with a thumb anywhere on the screen brings up a hidden menu containing the same items as located in the top action bar. Once the menu is open, tapping the desired item with the same thumb is easy.
Two Menu Designs
A C-Swipe gesture can be made in two different but important ways: as a swipe and release or as a swipe only. In each case, the menu would look different. Pick the one that is right for your app. The swipe-and-release design puts the icons inside the menu tiles, as seen in figure 2 above.
The user would swipe the surface with a semi-circular gesture and then release their thumb from the surface of the device. The release is crucial here because otherwise the thumb would cover most of the menu items, making usage awkward.
The second type is swipe only, shown in figure 3 below. The system recognizes the same swipe gesture, but this time the menu is painted while the thumb is still pressed to the surface of the device. Because the thumb is covering the menu options (by design), the items must appear outside of the menu to be visible.
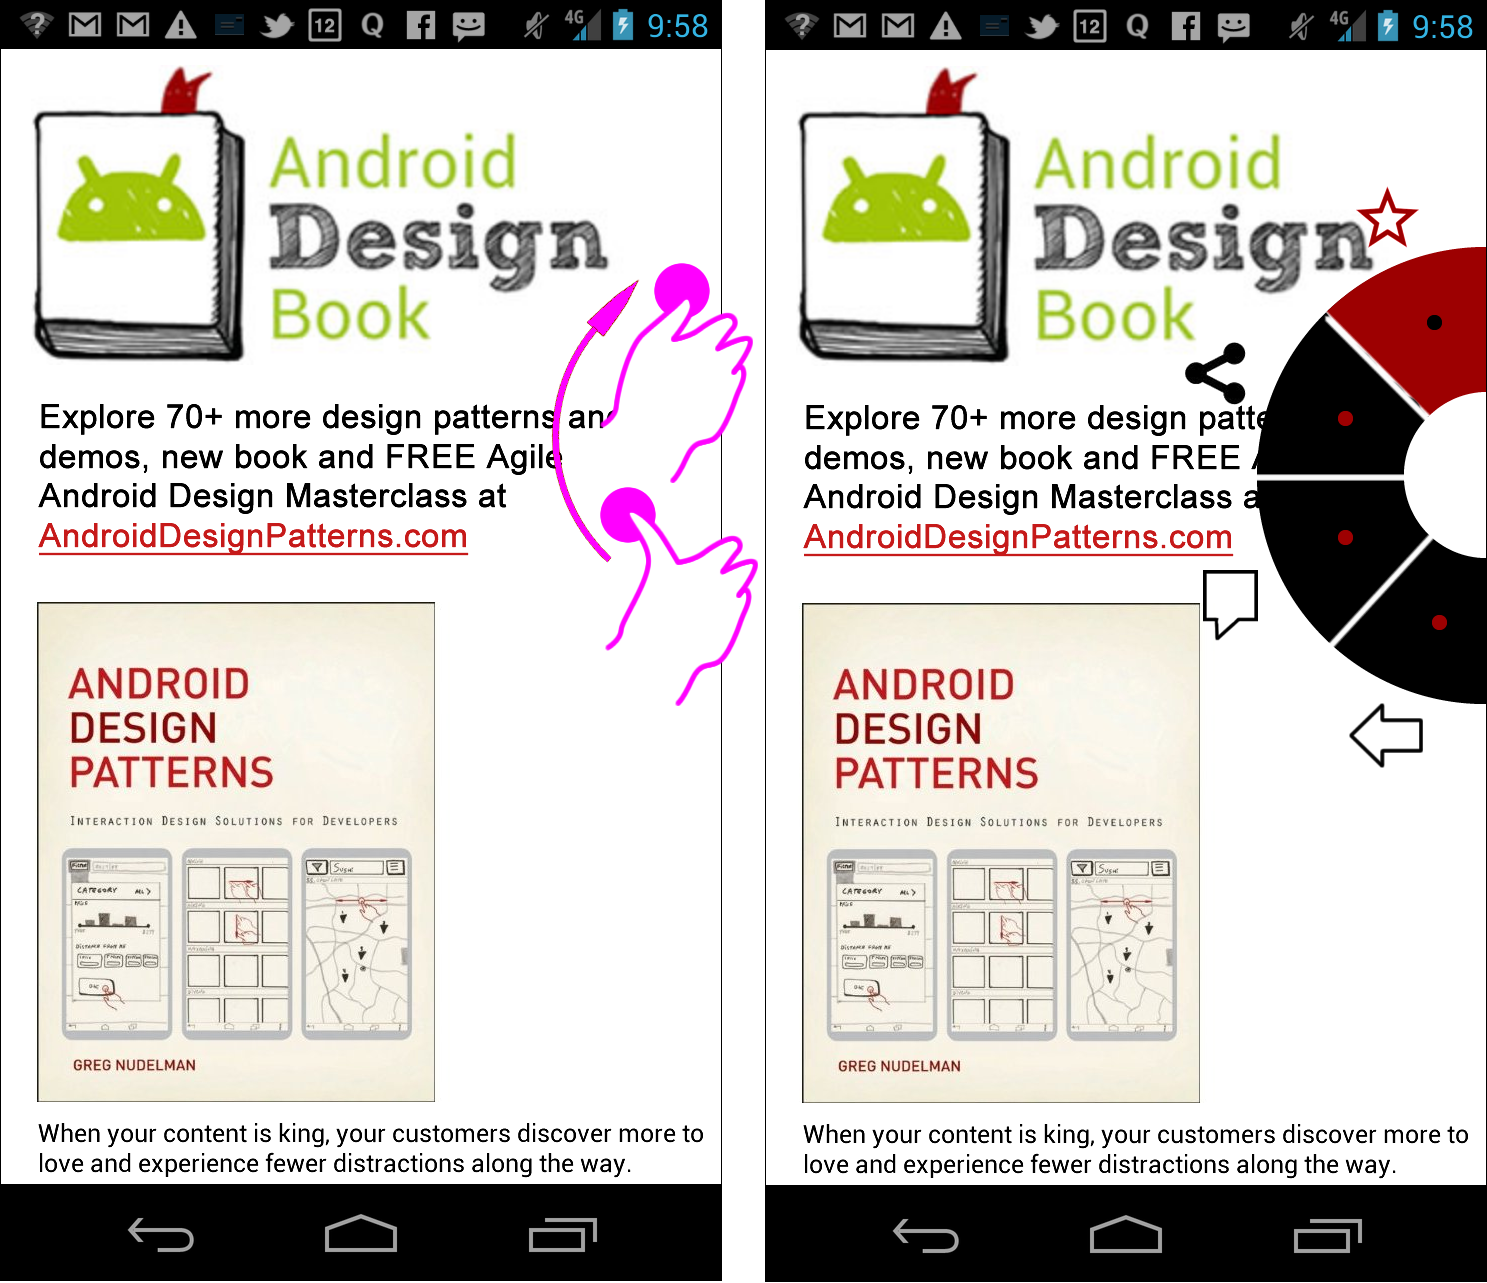
Fig. 3: The swipe-only implementation of C-Swipe puts the icons outside of the menu. Larger view.
Which interaction should you choose?
With swipe only, the thumb maintains contact with the device, activating the menu immediately. This makes navigation efficient: there is literally no wasted motion. However, many testers have preferred the Spartan design that positions icons inside the menu. Try both and decide for yourself, using the enclosed downloadable mini-app. The app features a mixture of the two modes: it uses the swipe-and-release gesture, but positions the icons outside of the menu bar so that you can see how it looks.
Note: Keep in mind that the swipe motion to call up the menu in the demo mini-app requires you to draw a fairly small semi-circle, probably smaller than you’d expect. I wanted this basic demo to work on all devices, small and large, in a wide variety of touchscreen form factors and resolutions (we are hoping to cover all 3,997). Another reason is the anatomy of the human hand: it is much less awkward for a person with large hands to make a small semi-circle gesture with their thumb than for a person with small hands to make a large gesture.
Complete Action Bar Replacement
C-Swipe is basically a complete replacement of the current action bar menu in Android, so you can use it anywhere you might currently use the action bar. As I describe in my upcoming book, Android Design Patterns: Interaction Solutions for Developers, particularly good candidates for the C-Swipe pattern today are experiences that call for a lights-out mode, with hidden Swiss Army knife-style navigation, such as for reading and browsing a magazine.
Another important point is that C-Swipe is almost infinitely extensible: It can be used to add more menu functions than can be seen on the screen, plus two or three levels of menus on top of the existing first-level menu scheme. To access overflow menu functions, the semi-circle inside the circular menu can be enabled as a separate button. As shown in figure 4 below, tapping that button spins the circle around, bringing up the overflow functions; tapping it again returns the menu to the original view. This allows the user to comfortably access 8 to 12 top-level functions.

Fig. 4: Accessing the C-Swipe overflow menu by tapping the central button. Larger view.
To add submenus, consider exploring both swipe-and-release and swipe only:
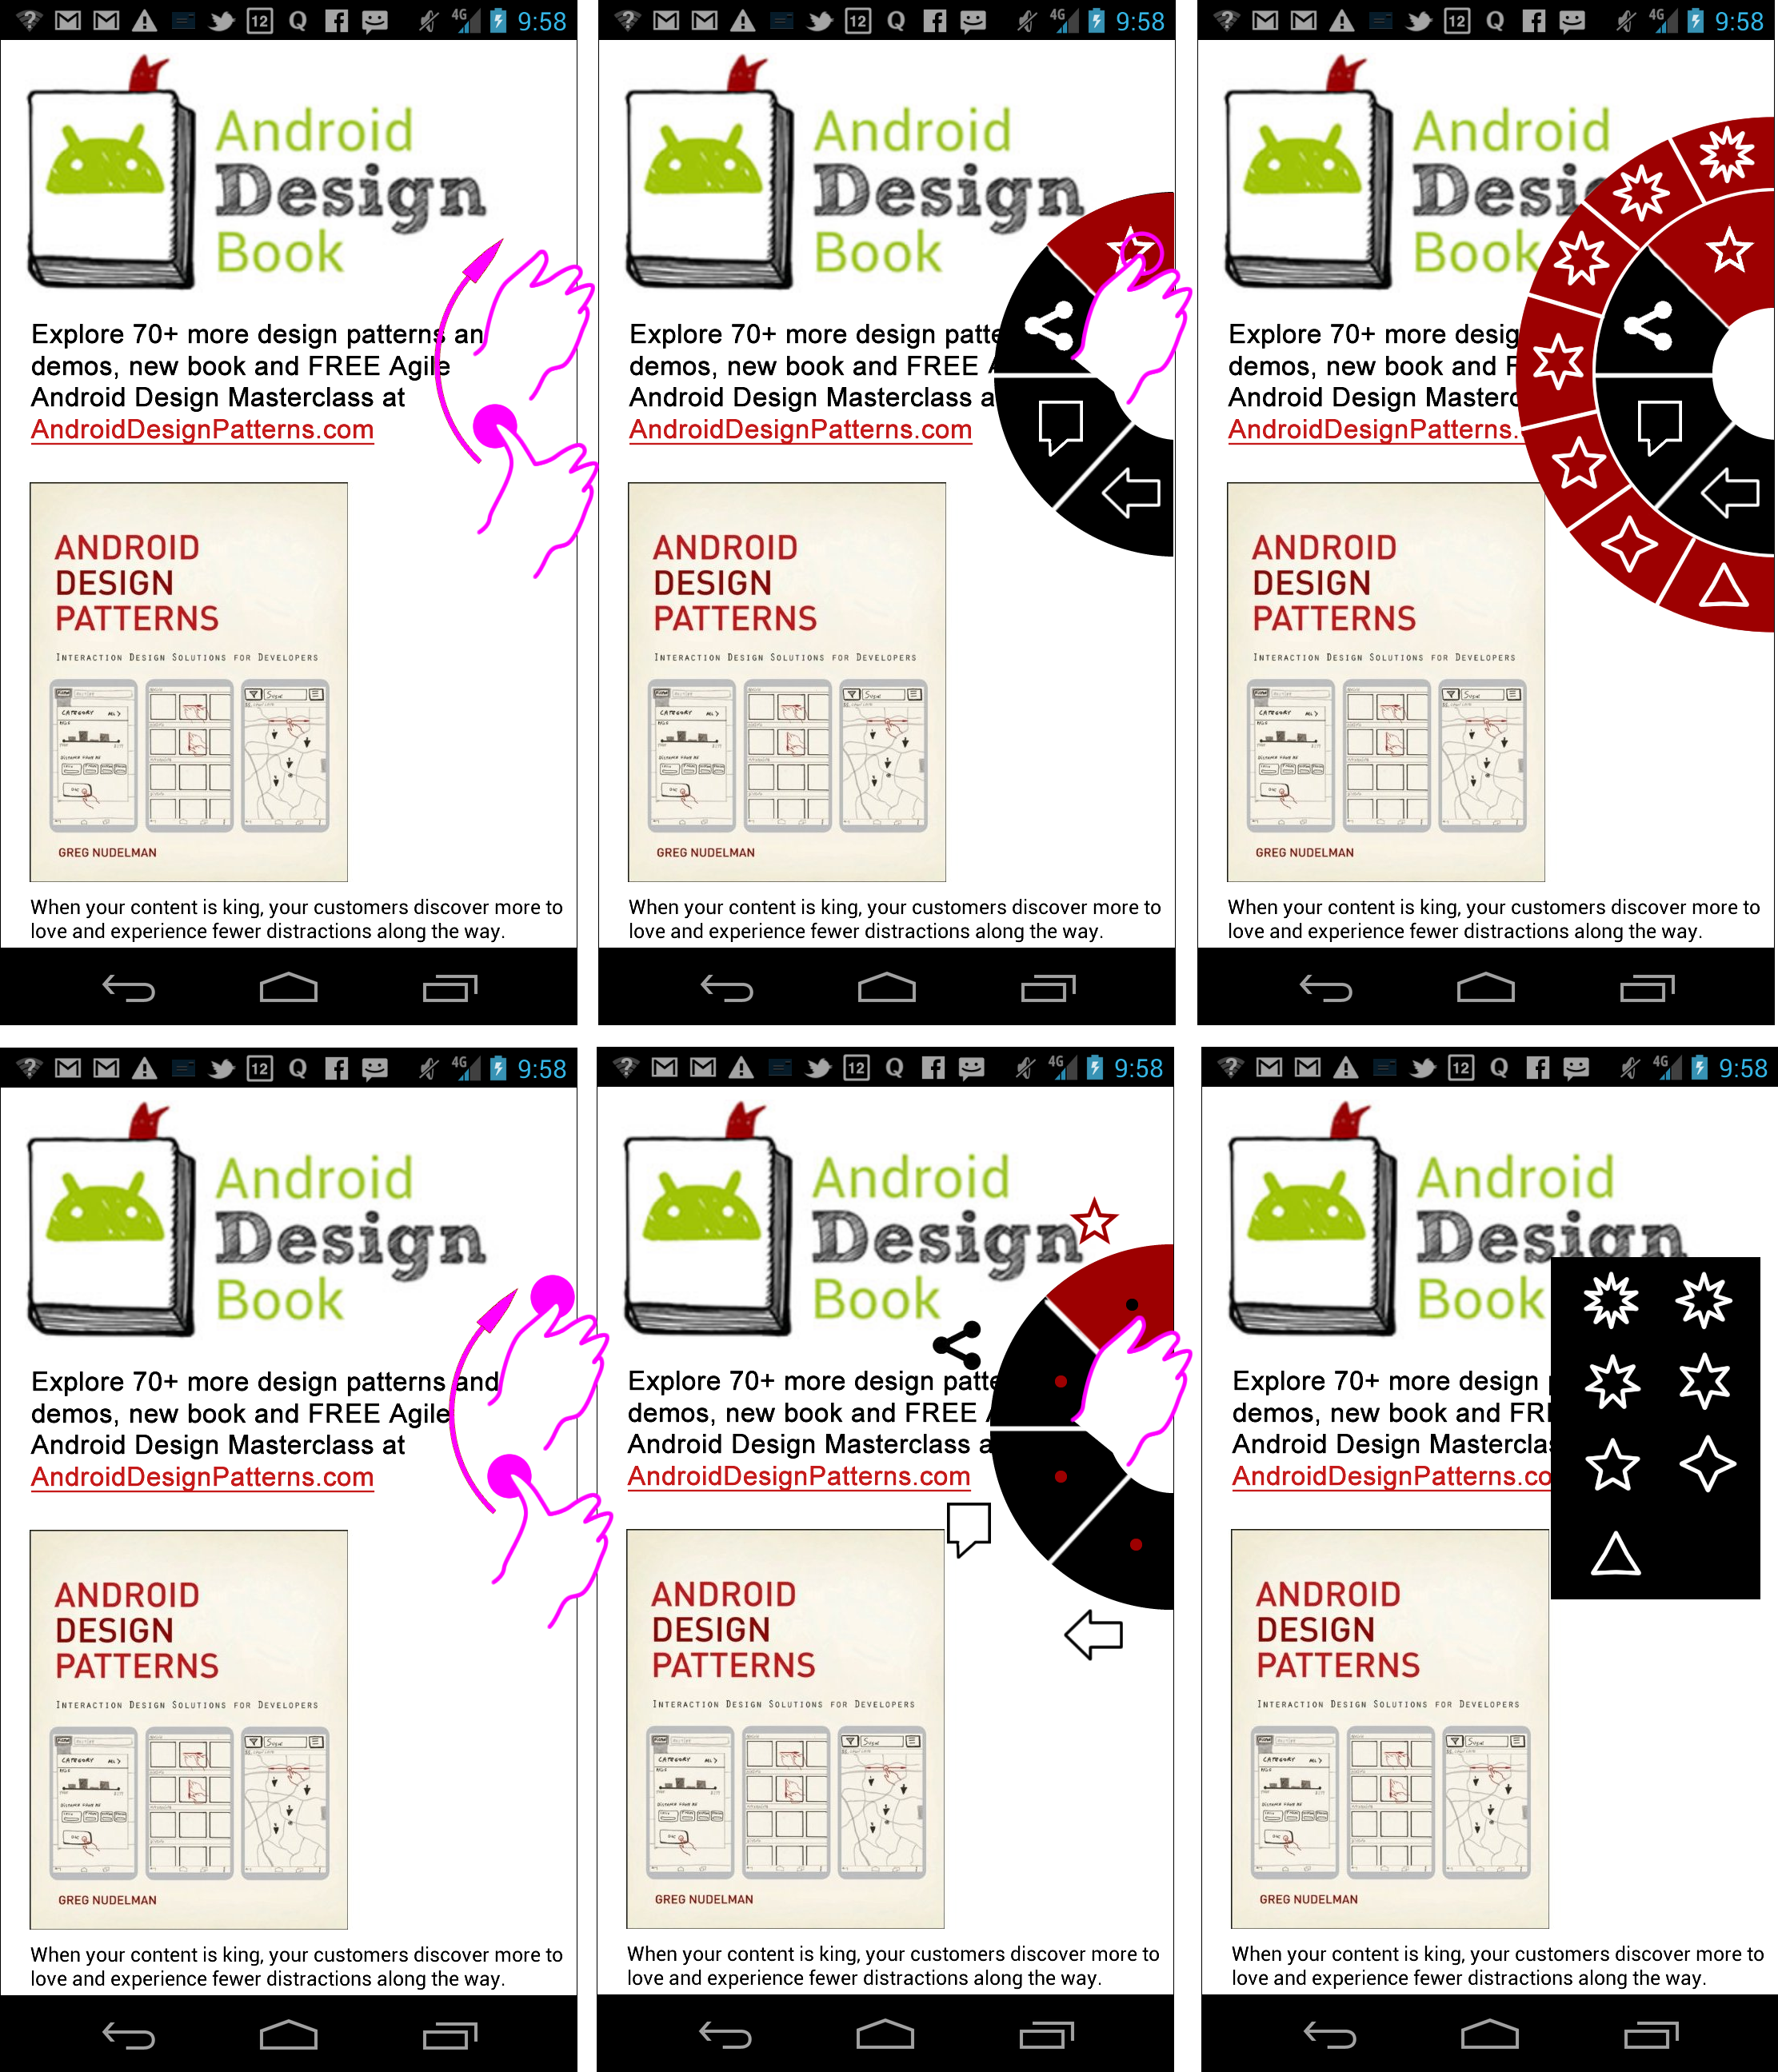
Fig. 5: Two ways to access the C-Swipe submenu. Larger view.
The top row shows swipe-and-release; tapping the “favorite” function in the open C-Swipe menu brings up a circular selection of stars. The user has to release their thumb from the screen to see the functions available in the submenu, and then tap the option they desire.
Swipe-and-hold (shown in the bottom row) works similarly; the user swipes and keeps their thumb on the screen. Upon sliding their thumb to the desired function (for example, “favorite”), the user would release their thumb from the screen. Then, the main menu would be replaced with the submenu.
The point is that the C-Swipe theme has many variations, and the submenu does not need to be semi-circular. It could be a long list of text and/or icons or a dedicated lightbox, as long as it comes up near where the main C-Swipe menu was invoked.
Why Use C-Swipe?
C-swipe has a number of important benefits:
- Facilitates immersive experiences. This highly immersive pattern keeps functionality hidden until needed. It opens up 100% of the screen on any of Android’s 3,997 device types to immersive experiences such as shopping, reading, movie viewing and virtual reality.
- Minimizes arm strain. C-Swipe is particularly suitable for large touch devices, such as the upcoming 15-, 17- and 21-inch touch tablets. Reaching the top or bottom action bars in Android 4’s existing navigation scheme would require large arm gestures, quickly leading to arm fatigue. By contrast, the C-Swipe menu appears wherever the hand is positioned on the screen and does not require large arm movements.
- Obeys Fitts’ Law Fitts’ Law stipulates that the speed and ease of tapping a button correlates to the size of the target and the distance to it. Thus, tapping a small button on a large tablet is painfully slow and awkward. C-Swipe is unique because it creates navigation anywhere on the screen, and the menu always shows up exactly where the hand is positioned, so the movement needed to select an item is minimal. As a result, movements are more precise and natural.
- Triggered uniquely. C-Swipe uses a gesture that (as of the time of writing) is not used for anything else. Thus, it is not likely to be triggered accidentally, and closing it is as easy as tapping anywhere on the screen outside of the menu.
Note that the gesture is a “reverse C” when executed with the left hand. The enclosed source code and mini-app will work with either hand doing the gesture.
Other Applications
C-Swipe does not need to be activated near the edge. When the user tilts a large touchscreen in order to use it comfortably while standing, the C-Swipe navigation can be opened anywhere by making a semicircular swipe with the thumb. Usually, the user would first need to touch the screen with one of the other fingers, such as the index finger, to support the compact gesture.
C-Swipe is unique because it comes with its own “natural” animated transition. The menu simply spins out in a semicircular path, following the movement of the thumb as closely as possible.
Caution
C-Swipe is not easily discoverable. But its discoverability can be aided with an animated watermark or another gentle tutorial pattern. Stating something like, “Swipe with your thumb anywhere on the screen,” or animating a watermark several times in different places on the screen can help users discover the gesture:
Fig. 6: Introducing C-Swipe with an animated watermark pattern. Larger view.
Upon being discovered, the watermark can be permanently removed. C-Swipe is quickly learned, because it is familiar and convenient for the hand and thumb.
Some people believe that the drawback of a C swipe is that it is ergonomically complex and does not translate into anything “real” (like a scroll or a pan). Other designers prefer the larger gestures of Windows’ modern UI, where the entire arm transverses the screen from left to right and top to bottom. Still other designers prefer an alternative for large displays: a special multitouch gesture — for example, a five-finger tap or five-finger pinch.
I disagree.
While each of these alternatives to C-Swipe holds a great deal of promise, I find C-Swipe to be the most natural, authentic and economical of touch movements. It is also natural, almost like the user is scratching or grabbing to “dig” into the content on the screen. The swipe can be performed effortlessly with one hand, with the device in almost any position, during almost any typical activity on a mobile device. Much testing with a broad range of people is needed to confirm this.
However, one thing is clear: regardless of the gesture, being able to call up a contextual menu locally on demand is the right model for all kinds of touch devices — so my biggest caution would be not to ignore this important trend.
Source Code Explained
As you can imagine, this function is fairly complex, so this is just a cursory overview, highlighting the main points as you explore the enclosed source code (ZIP).
In order to build the app, you have to first record the custom C-Swipe gesture using the GestureBuilder delivered with the Android SDK. You can read about this detailed procedure in “Creating a Simple Gesture App With Android” by Micha Kops.
Then, in your CSwipeActivity class, you will need to load the custom C-Swipe gesture from the library:
// Load gestures library
        mGestureLib = GestureLibraries.fromRawResource(this, R.raw.gestures_cswipe);
        if (!mGestureLib.load()) {
            // Show toast if gestures library could not be loaded
            Toast.makeText(this, R.string.KMsgErrLoadingGestures, Toast.LENGTH_SHORT).show();
        }
Next, set up a listener to monitor for when the desired gesture is performed.
// Register gestures listener
        mGestureOverlayView.addOnGesturePerformedListener(new GestureOverlayView.OnGesturePerformedListener() {
            @Override
            public void onGesturePerformed(GestureOverlayView gestureOverlayView, Gesture gesture) {
                onGesture(gestureOverlayView, gesture);
            }
        });
When any gesture is performed, you can check whether it matches the C-Swipe gesture using the onGesture() method. We can check whether the gesture performed by the user matches C-Swipe by seeing whether its prediction score is higher than some predetermined value. In this simple demo, we’ve set a middle-of-the-road value of 3D. Experiment to find the right value. If it is too low, then simple swipes will trigger the function accidentally; if the threshold is too high, then activating the gesture will be too difficult. When the right gesture is detected, the app inflates the special circular menu and populates it with the predefined items.
if (prediction.score > 3D) {
                // Switch content from gesture overlay view to original content view
                mGestureOverlayView.removeView(mContentView);
                setContentView(mContentView);
// Inflate the CSwipe control view
                final View cSwipePopupContentView = getLayoutInflater().inflate(R.layout.view_cswipe, null);
                mCSwipe = (CSwipe) cSwipePopupContentView.findViewById(R.id.cswipe);
In our demo mini-app, two kinds of C-Swipes are possible: left and right orientation. This is checked by the following code, which then sets the orientation for the menu anchor.
// Check the orientation of the CSwipe control based on the selected gesture prediction
                final String predictionName = prediction.name;
                CSwipe.Anchor cSwipeAnchor = CSwipe.Anchor.RIGHT;
                if (predictionName.equals(GESTURE_CSWIPE_LEFT_MARGIN)) { cSwipeAnchor = CSwipe.Anchor.LEFT; }
                else if (predictionName.equals(GESTURE_CSWIPE_RIGHT_MARGIN)) { cSwipeAnchor = CSwipe.Anchor.RIGHT; }

                // Set the CSwipe control anchor according to the selected gesture prediction
                mCSwipe.setAnchor(cSwipeAnchor);
Set the menu as close as possible to the gesture anchor in order to maintain the illusion of a seamless menu launching directly from the gesture-bounding rectangle.
// Show the CSwipe control popup window as close as possible to the gesture bounding rectangle
                final RectF gestureBoundingRect = gesture.getBoundingBox();
                mCSwipePopupWindow.showAtLocation(mContentView, Gravity.NO_GRAVITY, (int) gestureBoundingRect.left, (int) gestureBoundingRect.top);
To launch the distinctive semi-circular menu defined by the outer and inner radius, instantiate the CSwipe class. You can find the complete CSwipe.java code in the Widget folder.
public CSwipe(Context context, AttributeSet attrs, int defStyle) {
        super(context, attrs, defStyle);

        final TypedArray attributes = context.obtainStyledAttributes(attrs, R.styleable.CSwipe);

        mInnerArcRadius = attributes.getDimensionPixelSize(R.styleable.CSwipe_innerArcRadius,
                (int) TypedValue.applyDimension(TypedValue.COMPLEX_UNIT_DIP, DEFAULT_INNER_RADIUS_DP, getResources().getDisplayMetrics()));
        mOuterArcRadius = attributes.getDimensionPixelSize(R.styleable.CSwipe_outerArcRadius,
                (int) TypedValue.applyDimension(TypedValue.COMPLEX_UNIT_DIP, DEFAULT_OUTER_RADIUS_DP, getResources().getDisplayMetrics()));
Summary
I will leave it to you, readers, to polish the code for various enhancements: to improve the response time; to create a slick “swing out” opening transition; to tune the gesture threshold; and even to customize the gesture-detection algorithm over time to “learn,” thus ensuring the best fit for the device type and the owner’s hand size. For now, this demo app should give a good feel for the potential of C-Swipe navigation.
Read about how to install the mini-app on your device in the “Try It Out” section of my previous article on Smashing Magazine, “A Definitive Guide to the Android Carousel Design Pattern.”
This code is provided free of charge and distributed under the GNU General Public License v3. See the README_LICENSE file for details. Download the demo mini-app and source code (ZIP).
Enjoy — and be sure to let me know what you think in the comments below.
Further Reading
- What Every App Developer Should Know About Android
- How To Design For Android
- Designing For A Maturing Android
- How To Design For Android Tablets


