Getting Your App Ready For iOS 7’s New Dynamic Interactions

Email Newsletter
Weekly tips on front-end & UX.
Trusted by 200,000+ folks.


 Flexible CMS. Headless & API 1st
There’s no need to bust out a physics textbook to make your iOS 7 app’s views animate like real-world objects. With iOS 7’s new Dynamics API, views can be influenced by gravity, attached to each other with springs, and bounced up against boundaries and each other.
Physics engines are no stranger to game designers. Whether it’s the perfect gravity-induced parabolas of Angry Birds or the swinging candy in Cut the Rope, we’re used to objects in games feeling real. To get this effect, game designers don’t write code to set the position of each object manually. Instead, they use a physics engine that treats the elements as bodies in a simulation and that uses Newton’s laws of motion to calculate how they move over time.
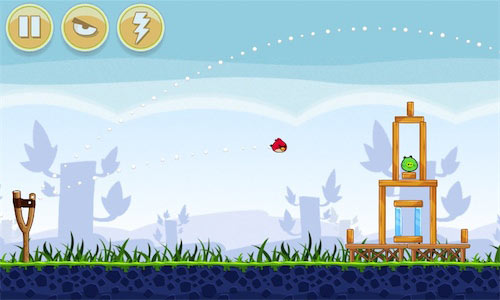
The birds travel along a trajectory determined by physics (Image credits).
In using the engine, designers specify an object’s bounciness, its density, the level of gravity, and how things are attached to each other. In iOS 7, Apple made that technology available to UIKit-based apps as well.
With these new UIKit features, we can integrate dynamic behavior without having to learn how to program a game engine. If you use them carefully, your UX will be more immersive and intuitive because users will interact with it as they would with objects in the real world.
Where Would You Use This?
If you are looking for places in your app to upgrade to feel more iOS 7-native, any animation is a candidate. You can see it all over the built-in apps, which will give you some ideas. I’d look anywhere that you’re already using several parallel animations with overlapping timelines and timed triggers to start other ones. Are you trying to do something that the Dynamics system would do for you automatically?
Another great candidate is anywhere you are using pan gestures to manipulate views, particularly with screen transitions. Play around with the camera icon on your phone’s lock screen to see an example. Tapping it will create an impulse force from the bottom, which gravity eventually overcomes. Dragging it up and dropping it shows how the view has an elastic bottom that bounces against the phone’s edge. You can even give the view an initial velocity by slamming it down.
See It in Action
I’ve put together a simple video demo of Dynamics to show how you can use it for view transitions. The first part of the video shows what you could do easily in iOS 6 and below. It simply attaches a pan gesture to the view and uses its y-translation to set the center of the view. This gives the illusion that you are directly moving it. Then, when you end the pan gesture by lifting your finger, it triggers a Core Animation that returns the center to its starting position. This automatically slides the view down as if it’s falling.
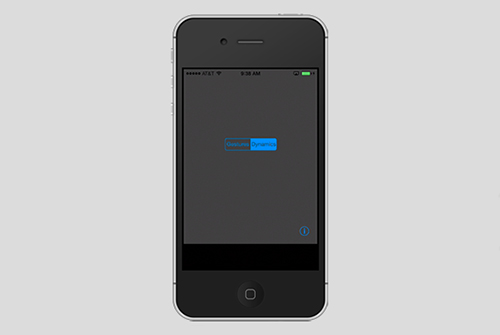
Video demo of UIDynamics in action.
The second part is similar but is done with the Dynamics physics engine. We’re still making a pan gesture, but we attach it to the view with a spring. Then, we make the bottom of the screen a solid barrier to collide against and add gravity. Now, when we grab the view, it follows our finger as before (but with a springy connection), and when we let go, the view falls with an acceleration determined by the gravity field. When it lands, it bounces. We can also throw the view by letting go while our finger is moving, and the velocity of our finger will be imparted to the view.
You can get the project by cloning DynamicUtility on GitHub. If you don’t have Xcode, you can install it on your machine through the Mac App Store. In Xcode, open DynamicUtility.xcodeproj, and run it in the simulator (Command + R). If you have a developer account with Apple, the effect is even better on a phone.
Piecing It Together With Core Animation Before iOS 7
Core Animation is a powerful system, and you can absolutely get exactly the same results using it (with a lot of work). The advantage of the Dynamics system is that you are able to express what you want in terms of physical attributes, and layering more and more complex behavior and playing around with it are much easier. In an equivalent Core Animation set-up, the variables that govern the behavior aren’t as clear. Let’s look at a simple example.
In the Xcode Utility Application template, we start with two views, the main and flip side of an application. Let’s add a way for the user to pan the main view up to get to the flip side view using gestures and Core Animation.
To start, all we need to do is add a pan gesture to the storyboard and attach it to our view. Then, we can set up its selector action to send this message:
- (IBAction)onPan:(UIPanGestureRecognizer*)pan {
    static CGFloat startY;
    CGPoint delta = [pan translationInView:self.view.superview];

    if (pan.state == UIGestureRecognizerStateBegan) {
        startY = self.view.center.y;
        [pan setTranslation:CGPointZero inView:pan.view.superview];
    }
    else if (pan.state == UIGestureRecognizerStateChanged) {
        CGFloat newY = self.view.center.y + delta.y;

        // detect a collision with the bottom
        if (newY > startY) {
            newY = startY;
        }
        // attach the pan to the view
        self.view.center = CGPointMake(self.view.center.x, newY);

        [pan setTranslation:CGPointZero inView:pan.view.superview];
    } else if (pan.state == UIGestureRecognizerStateEnded) {
        // gravity?
        [UIView animateWithDuration:.3 animations:^{
            self.view.center = CGPointMake(self.view.center.x, startY);
        }];
    }
}
This is a simple implementation of an interaction that enables you to drag a view that drops back into place when let go. The first comment shows where we stop the user from dragging it down below the screen’s edge. The second one shows how we’re attaching it to the finger. The final comment shows where we animate it back into place.
This is a great start, but consider how you’d implement the following features:
- imparting your finger’s velocity to the view when you let it go,
- attaching the view to your finger with a spring,
- accelerating the drop based on a gravitational force,
- detecting collisions against the boundaries and bouncing the view against them.
Even after you did this, changing the animation so that gravity is stronger, the springs are springier, and every variable is exactly right would leave you with a code mess, or, to paraphrase Philip Greenspun, you’d end up with a poorly specified, half-implemented physics engine. We can use the Dynamics system instead.
iOS 7’s New Dynamics System Makes This Much Easier
The Dynamics system enables us to define a complex system of behavior by combining a few simple concepts. Let’s use a few to recreate the sliding effect in a more lifelike way.
Setting It Up
The Dynamics system is made up of three basic parts. UIDynamicAnimator controls the whole system by running the physics simulation and moving and rotating the objects. Each body in the simulation is represented by UIDynamicItem, a protocol implemented by UIView. Finally, we specify what we want to happen by creating and adding UIDynamicBehavior objects to the animator.
We’ll combine a few behaviors to get the effect we want:
UIAttachmentBehaviorThis lets us attach items to each other or to an anchor point. The attachment may be either a stiff strut or springy.UICollisionBehaviorThis adds a boundary that contains the views. If we had more than one view, we could use this to make them bounce against each other.UIGravityBehaviorThis specifies a gravitational field. If a view isn’t attached to something and isn’t up against a boundary, then gravity will draw it down (or in whatever direction we want).UIDynamicItemBehaviorThis describes attributes of the item it’s attached to. It controls whether the item may be rotated, how elastic it is and how much it resists movement.
To use the Dynamics system, we construct the behaviors we want and attach them to the items that they will affect. Then, we add them to the animator.
A Simple Gravity Demo
Let’s build a simple demo so that you get the hang of it before we jump into a view transition. First, you’ll need these properties in your header:
@property (strong, nonatomic) UIView *body;
@property (strong, nonatomic) UIDynamicAnimator *gravityAnimator;
Next, in your viewDidLoad message, add a call to this message:
-(void)addBodyView
{
  self.body = [[UIView alloc] initWithFrame:CGRectMake(155, 40, 10, 10)];
  self.body.backgroundColor = [UIColor blackColor];
  [self.view addSubview:self.body];
}
This will put a black square at the top of the view. In your storyboard, add a “Demo Gravity” button, and connect it to this action:
- (IBAction)onDemoGravity:(id)sender {
  self.body.center = CGPointMake(160, 50);
  self.gravityAnimator = [[UIDynamicAnimator alloc]
    initWithReferenceView:self.view];
  UIGravityBehavior *gravityBehavior = [[UIGravityBehavior alloc]
    initWithItems:@[self.body]];
  [self.gravityAnimator addBehavior:gravityBehavior];
}
The first line repositions the view at the top. The second line creates the animator, with your view as its reference. The next two lines just say that the body view we added is affected by gravity. Now, run it in the simulator, and tap your “Demo Gravity” button. The black square will drop to the bottom of the screen (and then keep going).
The Dynamics system also support collisions against objects and boundaries. A common boundary is the view that contains the animation (also called the reference view). To designate the reference view as a boundary, just add these three lines to the end of onDemoGravity:
  UICollisionBehavior *viewIsBoundary = [[UICollisionBehavior alloc]
    initWithItems:@[self.body]];
  viewIsBoundary.translatesReferenceBoundsIntoBoundary = YES;
  [self.gravityAnimator addBehavior:viewIsBoundary];
Now, when you run it, the box will bounce at the bottom of the view.
Our next step is to see how to control the parameters of the animation. To do this, the Dynamics system has a special behavior named UIDynamicItemBehavior, which is a collection of attributes that affect a given item. Let’s alter the elasticity of the box so that it bounces higher. Just add these lines to onDemoGravity:
  UIDynamicItemBehavior *itemBehavior = [[UIDynamicItemBehavior alloc]
    initWithItems:@[self.body]];
  itemBehavior.elasticity = .8;
  [self.gravityAnimator addBehavior:itemBehavior];
The elasticity defaults to 0 and can be set to any number between 0 and 1, where 1 represents complete elasticity — and a very long animation if we had used it in this case.
If you want to get a feel for how realistic this simulation is, try rotating the body view with this line (right after you’ve set its center):
self.body.transform = CGAffineTransformMakeRotation(M_PI/5.0);
When you run this, you’ll see that the simulation takes shape into account as well and bounces the object off its edges, not just up and down.
Making A Custom Behavior
For our simple demo, creating the behaviors right in an action message was fine, but for real apps, this would get complex very quickly. One nice thing about UIBehavior is that you can create composite behaviors by inheriting an object from UIDynamicBehavior and then adding child behaviors inside of its init message. This lets us package a set of related behaviors in a reusable class. Let’s replace our original iOS 6 gesture-based animation with a dynamic one by creating a new behavior class named LDUSlideBehavior.
Here’s a header file for our sliding behavior:
#import <UIKit/UIKit.h>

@interface LDUSlideBehavior : UIDynamicBehavior

-(instancetype) initWithItem:(UIView*) item;

@property (strong, nonatomic) UIPanGestureRecognizer* pan;
@property (strong, nonatomic) UIAttachmentBehavior *attachment;
@property (strong, nonatomic) UIDynamicItemBehavior *behavior;

@end
Our init takes the view that we’re going to slide. It looks like this:
-(instancetype) initWithItem:(UIView*)item
{
    if (self = [super init]) {
        // create a pan gesture
        self.pan = [[UIPanGestureRecognizer alloc]
           initWithTarget:self action:@selector(onPan:)];
        [item addGestureRecognizer:self.pan];

        // attach the view to a spring
        self.attachment = [[UIAttachmentBehavior alloc] initWithItem:item
            attachedToAnchor:CGPointMake(item.center.x, item.center.y)];
        self.attachment.damping = .1;
        self.attachment.frequency = 5.0;

        // make a boundary
        UICollisionBehavior * collision =
           [[UICollisionBehavior alloc] initWithItems:@[item]];
        [collision setTranslatesReferenceBoundsIntoBoundaryWithInsets:
            UIEdgeInsetsMake(-item.superview.bounds.size.height, 0, 0, 0)];
        collision.collisionMode = UICollisionBehaviorModeBoundaries;
        [self addChildBehavior:collision];

        // add a gravitational field
        UIGravityBehavior *gravity =
           [[UIGravityBehavior alloc] initWithItems:@[item]];
        [self addChildBehavior:gravity];

        // behavior parameters for the view
        self.behavior = [[UIDynamicItemBehavior alloc] initWithItems:@[item]];
        self.behavior.allowsRotation = NO;
        self.behavior.elasticity = .4;
        self.behavior.resistance = .7;
        [self addChildBehavior:self.behavior];
    }
    return self;
}
Breaking this down, we can see that all we’re doing is creating standard behaviors and adding them to our custom behavior. We don’t add UIAttachmentBehavior immediately because we want that to be active only when the pan gesture is active, so we’ll add and remove it in the onPan: message.
UICollisionBehavior uses insets on our parent’s bounds to set up a barrier around our simulation that has its top side set to be offset by the height of the view. The left, right and bottom boundaries are left in place, so that the view can slide up but not left, right or below the screen’s bounds.
One thing to notice is that we’ve set allowsRotation to NO. Strictly speaking, this shouldn’t be necessary because all of our motion is vertical and confined to a view with 0 horizontal space and all of the view’s edges are perfectly flat. There is simply no room for the view to rotate. However, UIDynamics sometimes have floating point errors, and if you don’t do this, then the view will sometimes rotate as you drag it. It’s impossible in the real world, but, as we know, computers can only simulate the real world. Another issue you might run into with dynamics and rounding is that a simulation could go on forever if the floating point error causes tiny movements. If you see this, you can monitor the animator’s elapsedTime and then call removeAllBehaviors to stop it.
We still need to implement a pan gesture handler, and we’ll do that right in the custom behavior class. Here it is:
-(void)onPan:(UIPanGestureRecognizer*)pan
{
    if (pan.state == UIGestureRecognizerStateBegan) {
        [self addChildBehavior:self.attachment];
    }
    else if (pan.state == UIGestureRecognizerStateChanged) {
        CGPoint delta = [pan translationInView:pan.view.superview];
        self.attachment.anchorPoint =
            CGPointMake(self.attachment.anchorPoint.x,
                        self.attachment.anchorPoint.y + delta.y);
        [pan setTranslation:CGPointZero inView:pan.view.superview];
    }
    else if (pan.state == UIGestureRecognizerStateEnded ||
             pan.state == UIGestureRecognizerStateCancelled ||
             pan.state == UIGestureRecognizerStateFailed) {
        [self removeChildBehavior:self.attachment];
        // impart the velocity to the view when we let it go
        [self.behavior addLinearVelocity:
            [pan velocityInView:pan.view.superview] forItem:pan.view];
    }
}
When the gesture begins, we add the UIAttachmentBehavior, and we remove it once the gesture is over. While it’s changing, we just need to move the attachment’s anchor point to stay under the user’s finger, and the behavior object will move the view that we attached to it as if it were attached with a spring.
Note the last line of function, where we take the velocity of the pan and add it to the item that’s being dragged. This enables the animation to transition very smoothly from panning to what happens after we let it go.
Finally, we need to clean up our pan gesture when we are deallocated.
-(void) dealloc
{
    [self.pan removeTarget:self action:@selector(onPan:)];
    [self.pan.view removeGestureRecognizer:self.pan];
}
This class may be infinitely customized. For example, the damping and frequency of the spring may be changed using the attachment, and the gravitational constant may be set in the gravity behavior. The UIDynamicItemBehavior class has a few more properties to play with. And we’ve only scratched the surface, because other behavior classes can simulate magnets, constant and impulse forces and a few other things.
Adding The Behavior To An Animator
Now that we have a custom behavior class, adding it to the animator is easy. The UIDynamicAnimator class must be instantiated and retained throughout the life of the simulation, so the easiest thing to do is use a property on your view controller.
Then, just allocate it and add in the behavior, like so:
-(void)setUpDynamics
{
    self.animator = [[UIDynamicAnimator alloc]
      initWithReferenceView:self.view.superview];
    [self.animator addBehavior:[[LDUSlideBehavior alloc]
      initWithItem:self.view]];
}
That’s all there is to it. To download the full project, just clone DynamicUtility on GitHub
Where To Go From Here
Take a good look at your own apps. A good place to start with dynamics is when you transition from one screen to another. If you are using a swipe gesture, consider replacing it with a pan gesture attached to a view, and let the user directly manipulate it. For example, instead of swiping an object to bring up a menu to delete it, let them throw it away directly by tossing it.
But be careful. Don’t add dynamics just to show off. Used correctly, dynamics add playfulness and immersion but, if overused, can make an app feel like a mishmash of fancy effects.
To learn more, watch the WWDC 2013 video “Getting Started With UIKit Dynamics,” then download the Dynamics Catalog sample app. This sample app is a comprehensive catalog of the various behaviors and their uses. And if you need details on any of the classes or messages, read Apple’s official documentation on UIDynamics in the “UIKit” section.
Further Reading
- A User-Centered Approach To Web Design For Mobile Devices
- The Elements Of The Mobile User Experience
- A Guide To Designing Touch Keyboards (With Cheat Sheet)
- Beyond The Button: Embracing The Gesture-Driven Interface


