Sending Emails Asynchronously Through AWS SES

Email Newsletter
Weekly tips on front-end & UX.
Trusted by 200,000+ folks.


 Flexible CMS. Headless & API 1st
 Register!
Most applications send emails to communicate with their users. Transactional emails are those triggered by the user’s interaction with the application, such as when welcoming a new user after registering in the site, giving the user a link to reset the password, or attaching an invoice after the user does a purchase. All these previous cases will typically require sending only one email to the user. In some other cases though, the application needs to send many more emails, such as when a user posts new content on the site, and all her followers (which, in a platform like Twitter, may amount to millions of users) will receive a notification. In this latter situation, not architected properly, sending emails may become a bottleneck in the application.
That is what happened in my case. I have a site that may need to send 20 emails after some user-triggered actions (such as user notifications to all her followers). Initially, it relied on sending the emails through a popular cloud-based SMTP provider (such as SendGrid, Mandrill, Mailjet and Mailgun), however the response back to the user would take seconds. Evidently, connecting to the SMTP server to send those 20 emails was slowing the process down significantly.
After inspection, I found out the sources of the problem:
- Synchronous connection
The application connects to the SMTP server and waits for an acknowledgment, synchronously, before continuing the execution of the process. - High latency
While my server is located in Singapore, the SMTP provider I was using has its servers located in the US, making the roundtrip connection take considerable time. - No reusability of the SMTP connectionWhen calling the function to send an email, the function sends the email immediately, creating a new SMTP connection on that moment (it doesn’t offer to collect all emails and send them all together at the end of the request, under a single SMTP connection).
Because of #1, the time the user must wait for the response is tied to the time it takes to send the emails. Because of #2, the time to send one email is relatively high. And because of #3, the time to send 20 emails is 20 times the time it takes to send one email. While sending only one email may not make the application terribly slower, sending 20 emails certainly does, affecting the user experience.
Let’s see how we can solve this issue.
Paying Attention To The Nature Of Transactional Emails
Before anything, we must notice that not all emails are equal in importance. We can broadly categorize emails into two groups: priority and non-priority emails. For instance, if the user forgot the password to access the account, she will expect the email with the password reset link immediately on her inbox; that is a priority email. In contrast, sending an email notifying that somebody we follow has posted new content does not need to arrive on the user’s inbox immediately; that is a non-priority email.
The solution must optimize how these two categories of emails are sent. Assuming that there will only be a few (maybe 1 or 2) priority emails to be sent during the process, and the bulk of the emails will be non-priority ones, then we design the solution as follows:
- Priority emails can simply avoid the high latency issue by using an SMTP provider located in the same region where the application is deployed. In addition to good research, this involves integrating our application with the provider’s API.
- Non-priority emails can be sent asynchronously, and in batches where many emails are sent together. Implemented at the application level, it requires an appropriate technology stack.
Let’s define the technology stack to send emails asynchronously next.
Defining The Technology Stack
Note: I have decided to base my stack on AWS services because my website is already hosted on AWS EC2. Otherwise, I would have an overhead from moving data among several companies’ networks. However, we can implement our soluting using other cloud service providers too.
My first approach was to set-up a queue. Through a queue, I could have the application not send the emails anymore, but instead publish a message with the email content and metadata in a queue, and then have another process pick up the messages from the queue and send the emails.
However, when checking the queue service from AWS, called SQS, I decided that it was not an appropriate solution, because:
- It is rather complex to set-up;
- A standard queue message can store only up top 256 kb of information, which may not be enough if the email has attachments (an invoice for instance). And even though it is possible to split a large message into smaller messages, the complexity grows even more.
Then I realized that I could perfectly imitate the behavior of a queue through a combination of other AWS services, S3 and Lambda, which are much easier to set-up. S3, a cloud object storage solution to store and retrieve data, can act as the repository for uploading the messages, and Lambda, a computing service that runs code in response to events, can pick a message and execute an operation with it.
In other words, we can set-up our email sending process like this:
- The application uploads a file with the email content + metadata to an S3 bucket.
- Whenever a new file is uploaded into the S3 bucket, S3 triggers an event containing the path to the new file.
- A Lambda function picks the event, reads the file, and sends the email.
Finally, we have to decide how to send emails. We can either keep using the SMTP provider that we already have, having the Lambda function interact with their APIs, or use the AWS service for sending emails, called SES. Using SES has both benefits and drawbacks:
Benefits:
- Very simple to use from within AWS Lambda (it just takes 2 lines of code).
- It is cheaper: Lambda fees are computed based on the amount of time it takes to execute the function, so connecting to SES from within the AWS network will take a shorter time than connecting to an external server, making the function finish earlier and costing less. (Unless SES is not available in the same region where the application is hosted; in my case, because SES is not offered in the Asian Pacific (Singapore) region, where my EC2 server is located, then I might be better off connecting to some Asia-based external SMTP provider).
Drawbacks:
- Not many stats for monitoring our sent emails are provided, and adding more powerful ones requires extra effort (eg: tracking what percentage of emails were opened, or what links were clicked, must be set-up through AWS CloudWatch).
- If we keep using the SMTP provider for sending the priority emails, then we won’t have our stats all together in 1 place.
For simplicity, in the code below we will be using SES.
We have then defined the logic of the process and stack as follows: The application sends priority emails as usual, but for non-priority ones, it uploads a file with email content and metadata to S3; this file is asynchronously processed by a Lambda function, which connects to SES to send the email.
Let’s start implementing the solution.
Differentiating Between Priority And Non-Priority Emails
In short, this all depends on the application, so we need to decide on an email by email basis. I will describe a solution I implemented for WordPress, which requires some hacks around the constraints from function wp_mail. For other platforms, the strategy below will work too, but quite possibly there will be better strategies, which do not require hacks to work.
The way to send an email in WordPress is by calling function wp_mail, and we don’t want to change that (eg: by calling either function wp_mail_synchronous or wp_mail_asynchronous), so our implementation of wp_mail will need to handle both synchronous and asynchronous cases, and will need to know to which group the email belongs. Unluckily, wp_mail doesn’t offer any extra parameter from which we could asses this information, as it can be seen from its signature:
function wp_mail( $to, $subject, $message, $headers = '', $attachments = array() )Then, in order to find out the category of the email we add a hacky solution: by default, we make an email belong to the priority group, and if $to contains a particular email (eg: nonpriority@asynchronous.mail), or if $subject starts with a special string (eg: “[Non-priority!]“), then it belongs to the non-priority group (and we remove the corresponding email or string from the subject). wp_mail is a pluggable function, so we can override it simply by implementing a new function with the same signature on our functions.php file. Initially, it contains the same code of the original wp_mail function, located in file wp-includes/pluggable.php, to extract all parameters:
if ( !function_exists( 'wp_mail' ) ) :

function wp_mail( $to, $subject, $message, $headers = '', $attachments = array() ) {

  $atts = apply_filters( 'wp_mail', compact( 'to', 'subject', 'message', 'headers', 'attachments' ) );

  if ( isset( $atts['to'] ) ) {
    $to = $atts['to'];
  }

  if ( !is_array( $to ) ) {
    $to = explode( ',', $to );
  }

  if ( isset( $atts['subject'] ) ) {
    $subject = $atts['subject'];
  }

  if ( isset( $atts['message'] ) ) {
    $message = $atts['message'];
  }

  if ( isset( $atts['headers'] ) ) {
    $headers = $atts['headers'];
  }

  if ( isset( $atts['attachments'] ) ) {
    $attachments = $atts['attachments'];
  }

  if ( ! is_array( $attachments ) ) {
    $attachments = explode( "\n", str_replace( "\r\n", "\n", $attachments ) );
  }

  // Continue below...
}
endif;
And then we check if it is non-priority, in which case we then fork to a separate logic under function send_asynchronous_mail or, if it is not, we keep executing the same code as in the original wp_mail function:
function wp_mail( $to, $subject, $message, $headers = '', $attachments = array() ) {

  // Continued from above...

  $hacky_email = "nonpriority@asynchronous.mail";
  if (in_array($hacky_email, $to)) {

    // Remove the hacky email from $to
    array_splice($to, array_search($hacky_email, $to), 1);

    // Fork to asynchronous logic
    return send_asynchronous_mail($to, $subject, $message, $headers, $attachments);
  }

  // Continue all code from original function in wp-includes/pluggable.php
  // ...
}
In our function send_asynchronous_mail, instead of uploading the email straight to S3, we simply add the email to a global variable $emailqueue, from which we can upload all emails together to S3 in a single connection at the end of the request:
function send_asynchronous_mail($to, $subject, $message, $headers, $attachments) {

  global $emailqueue;
  if (!$emailqueue) {
    $emailqueue = array();
  }

  // Add email to queue. Code continues below...
}
We can upload one file per email, or we can bundle them so that in 1 file we contain many emails. Since $headers contains email meta (from, content-type and charset, CC, BCC, and reply-to fields), we can group emails together whenever they have the same $headers. This way, these emails can all be uploaded in the same file to S3, and the $headers meta information will be included only once in the file, instead of once per email:
function send_asynchronous_mail($to, $subject, $message, $headers, $attachments) {

  // Continued from above...

  // Add email to the queue
  $emailqueue[$headers] = $emailqueue[$headers] ?? array();
  $emailqueue[$headers][] = array(
    'to' => $to,
    'subject' => $subject,
    'message' => $message,
    'attachments' => $attachments,
  );

  // Code continues below
}
Finally, function send_asynchronous_mail returns true. Please notice that this code is hacky: true would normally mean that the email was sent successfully, but in this case, it hasn’t even been sent yet, and it could perfectly fail. Because of this, the function calling wp_mail must not treat a true response as “the email was sent successfully,” but an acknowledgment that it has been enqueued. That’s why it is important to restrict this technique to non-priority emails so that if it fails, the process can keep retrying in the background, and the user will not expect the email to already be in her inbox:
function send_asynchronous_mail($to, $subject, $message, $headers, $attachments) {

  // Continued from above...

  // That's it!
  return true;
}
Uploading Emails To S3
In my previous article “Sharing Data Among Multiple Servers Through AWS S3”, I described how to create a bucket in S3, and how to upload files to the bucket through the SDK. All code below continues the implementation of a solution for WordPress, hence we connect to AWS using the SDK for PHP.
We can extend from the abstract class AWS_S3 (introduced in my previous article) to connect to S3 and upload the emails to a bucket “async-emails” at the end of the request (triggered through wp_footer hook). Please notice that we must keep the ACL as “private” since we don’t want the emails to be exposed to the internet:
class AsyncEmails_AWS_S3 extends AWS_S3 {

  function __construct() {

    // Send all emails at the end of the execution
    add_action("wp_footer", array($this, "upload_emails_to_s3"), PHP_INT_MAX);
  }

  protected function get_acl() {

    return "private";
  }

  protected function get_bucket() {

    return "async-emails";
  }

  function upload_emails_to_s3() {

    $s3Client = $this->get_s3_client();

    // Code continued below...
  }
}
new AsyncEmails_AWS_S3();
We start iterating through the pairs of headers => emaildata saved in global variable $emailqueue, and get a default configuration from function get_default_email_meta for if the headers are empty. In the code below, I only retrieve the “from” field from the headers (the code to extract all headers can be copied from the original function wp_mail):
class AsyncEmails_AWS_S3 extends AWS_S3 {

  public function get_default_email_meta() {

    // Code continued from above...

    return array(
      'from' => sprintf(
        '%s <%s>',
        get_bloginfo('name'),
        get_bloginfo('admin_email')
      ),
      'contentType' => 'text/html',
      'charset' => strtolower(get_option('blog_charset'))
    );
  }

  public function upload_emails_to_s3() {

    // Code continued from above...

    global $emailqueue;
    foreach ($emailqueue as $headers => $emails) {

      $meta = $this->get_default_email_meta();

      // Retrieve the "from" from the headers
      $regexp = '/From:\s*(([^\<]*?) <)??\s*\n/i';
      if(preg_match($regexp, $headers, $matches)) {

        $meta['from'] = sprintf(
          '%s <%s>',
          $matches[2],
          $matches[3]
        );
      }

      // Code continued below...
    }
  }
}
Finally, we upload the emails to S3. We decide how many emails to upload per file with the intention to save money. Lambda functions charge based on the amount of time they need to execute, calculated on spans of 100ms. The more time a function requires, the more expensive it becomes.
Sending all emails by uploading 1 file per email, then, is more expensive than uploading 1 file per many emails, since the overhead from executing the function is computed once per email, instead of only once for many emails, and also because sending many emails together fills the 100ms spans more thoroughly.
So we upload many emails per file. How many emails? Lambda functions have a maximum execution time (3 seconds by default), and if the operation fails, it will keep retrying from the beginning, not from where it failed. So, if the file contains 100 emails, and Lambda manages to send 50 emails before the max time is up, then it fails and it retries executing the operation again, sending the first 50 emails once again. To avoid this, we must choose a number of emails per file that we are confident is enough to process before the max time is up. In our situation, we could choose to send 25 emails per file. The number of emails depends on the application (bigger emails will take longer to be sent, and the time to send an email will depend on the infrastructure), so we should do some testing to come up with the right number.
The content of the file is simply a JSON object, containing the email meta under property “meta”, and the chunk of emails under property “emails”:
class AsyncEmails_AWS_S3 extends AWS_S3 {

  public function upload_emails_to_s3() {

    // Code continued from above...
    foreach ($emailqueue as $headers => $emails) {

      // Code continued from above...

      // Split the emails into chunks of no more than the value of constant EMAILS_PER_FILE:
      $chunks = array_chunk($emails, EMAILS_PER_FILE);
      $filename = time().rand();
      for ($chunk_count = 0; $chunk_count < count($chunks); $chunk_count++) {

        $body = array(
          'meta' => $meta,
          'emails' => $chunks[$chunk_count],
        );

        // Upload to S3
        $s3Client->putObject([
          'ACL' => $this->get_acl(),
          'Bucket' => $this->get_bucket(),
          'Key' => $filename.$chunk_count.'.json',
          'Body' => json_encode($body),
        ]);
      }
    }
  }
}
For simplicity, in the code above, I am not uploading the attachments to S3. If our emails need to include attachments, then we must use SES function SendRawEmail instead of SendEmail (which is used in the Lambda script below).
Having added the logic to upload the files with emails to S3, we can move next to coding the Lambda function.
Coding The Lambda Script
Lambda functions are also called serverless functions, not because they do not run on a server, but because the developer does not need to worry about the server: the developer simply provides the script, and the cloud takes care of provisioning the server, deploying and running the script. Hence, as mentioned earlier, Lambda functions are charged based on function execution time.
The following Node.js script does the required job. Invoked by the S3 “Put” event, which indicates that a new object has been created on the bucket, the function:
- Obtains the new object’s path (under variable
srcKey) and bucket (under variablesrcBucket). - Downloads the object, through
s3.getObject. - Parses the content of the object, through
JSON.parse(response.Body.toString()), and extracts the emails and the email meta. - Iterates through all the emails, and sends them through
ses.sendEmail.
var async = require('async');
var aws = require('aws-sdk');
var s3 = new aws.S3();

exports.handler = function(event, context, callback) {

  var srcBucket = event.Records[0].s3.bucket.name;
  var srcKey = decodeURIComponent(event.Records[0].s3.object.key.replace(/\+/g, " "));

  // Download the file from S3, parse it, and send the emails
  async.waterfall([

    function download(next) {

      // Download the file from S3 into a buffer.
      s3.getObject({
        Bucket: srcBucket,
        Key: srcKey
      }, next);
    },
    function process(response, next) {

      var file = JSON.parse(response.Body.toString());
      var emails = file.emails;
      var emailsMeta = file.meta;

      // Check required parameters
      if (emails === null || emailsMeta === null) {
        callback('Bad Request: Missing required data: ' + response.Body.toString());
        return;
      }
      if (emails.length === 0) {
        callback('Bad Request: No emails provided: ' + response.Body.toString());
        return;
      }

      var totalEmails = emails.length;
      var sentEmails = 0;
      for (var i = 0; i < totalEmails; i++) {

        var email = emails[i];
        var params = {
          Destination: {
            ToAddresses: email.to
          },
          Message: {
            Subject: {
              Data: email.subject,
              Charset: emailsMeta.charset
            }
          },
          Source: emailsMeta.from
        };

        if (emailsMeta.contentType == 'text/html') {

          params.Message.Body = {
            Html: {
              Data: email.message,
              Charset: emailsMeta.charset
            }
          };
        }
        else {

          params.Message.Body = {
            Text: {
              Data: email.message,
              Charset: emailsMeta.charset
            }
          };
        }

        // Send the email
        var ses = new aws.SES({
          "region": "us-east-1"
        });
        ses.sendEmail(params, function(err, data) {

          if (err) {
            console.error('Unable to send email due to an error: ' + err);
            callback(err);
          }

          sentEmails++;
          if (sentEmails == totalEmails) {
            next();
          }
        });
      }
    }
  ],
  function (err) {

    if (err) {
        console.error('Unable to send emails due to an error: ' + err);
        callback(err);
    }

    // Success
    callback(null);
  });
};
Next, we must upload and configure the Lambda function to AWS, which involves:
- Creating an execution role granting Lambda permissions to access S3.
- Creating a .zip package containing all the code, i.e. the Lambda function we are creating + all the required Node.js modules.
- Uploading this package to AWS using a CLI tool.
How to do these things is properly explained on the AWS site, on the Tutorial on Using AWS Lambda with Amazon S3.
Hooking Up S3 With The Lambda Function
Finally, having the bucket and the Lambda function created, we need to hook both of them together, so that whenever there is a new object created on the bucket, it will trigger an event to execute the Lambda function. To do this, we go to the S3 dashboard and click on the bucket row, which will show its properties:
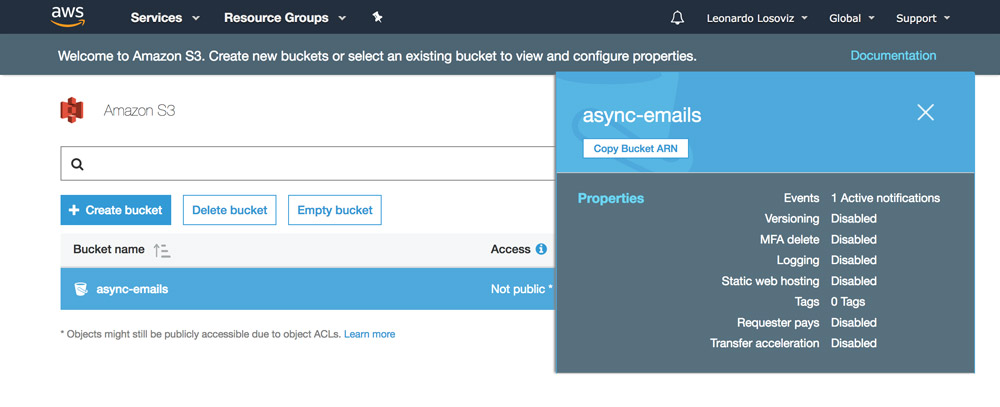
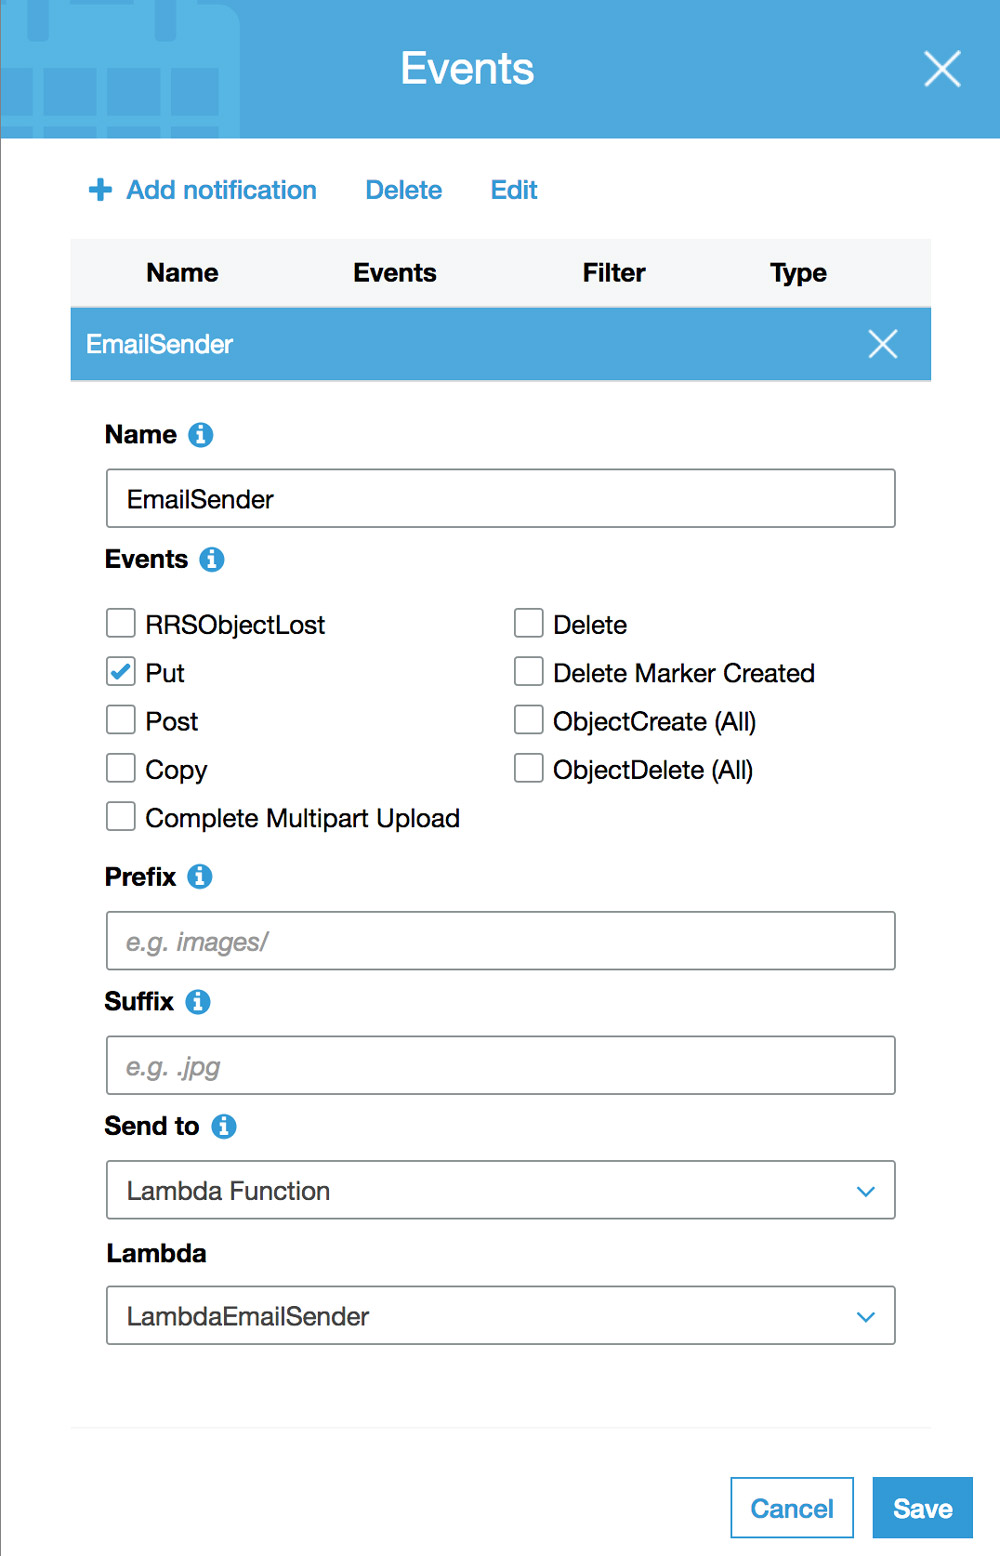
Then clicking on Properties, we scroll down to the item “Events”, and there we click on Add a notification, and input the following fields:
- Name: name of the notification, eg: “EmailSender”;
- Events: “Put”, which is the event triggered when a new object is created on the bucket;
- Send to: “Lambda Function”;
- Lambda: name of our newly created Lambda, eg: “LambdaEmailSender”.
Finally, we can also set the S3 bucket to automatically delete the files containing the email data after some time. For this, we go to the Management tab of the bucket, and create a new Lifecycle rule, defining after how many days the emails must expire:
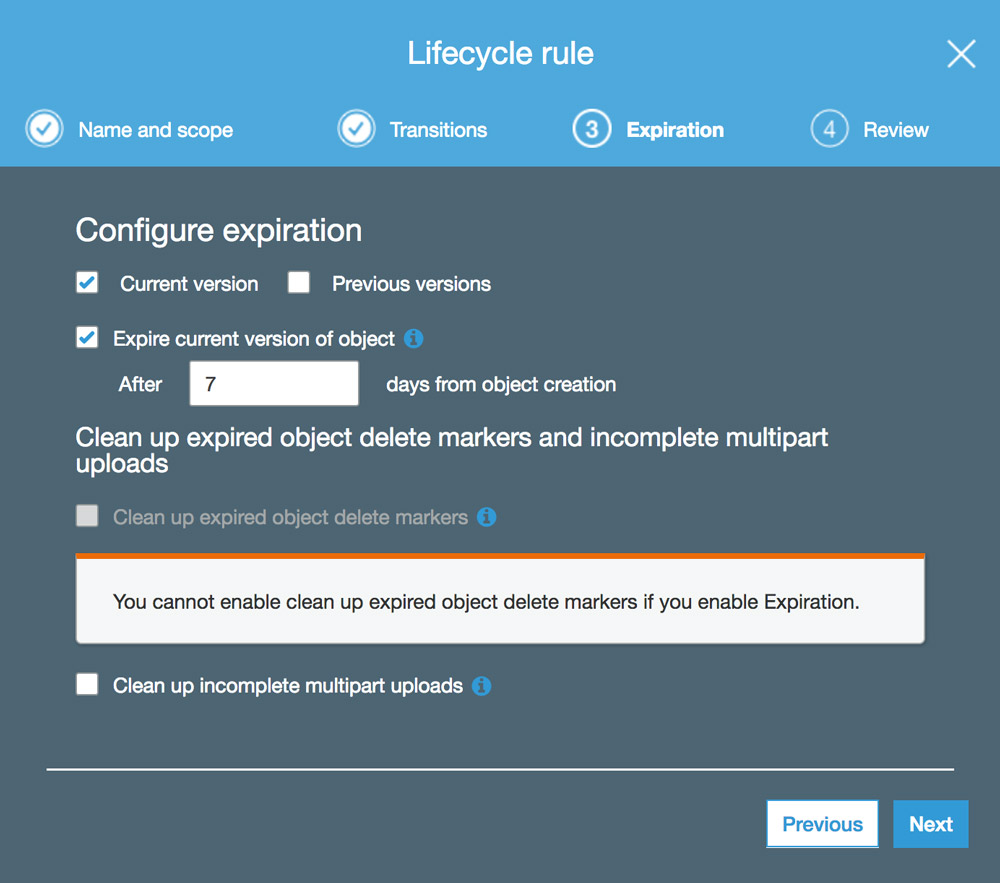
That’s it. From this moment, when adding a new object on the S3 bucket with the content and meta for the emails, it will trigger the Lambda function, which will read the file and connect to SES to send the emails.
I implemented this solution on my site, and it became fast once again: by offloading sending emails to an external process, whether the applications send 20 or 5000 emails doesn’t make a difference, the response to the user who triggered the action will be immediate.
Conclusion
In this article we have analyzed why sending many transactional emails in a single request may become a bottleneck in the application, and created a solution to deal with the issue: instead of connecting to the SMTP server from within the application (synchronously), we can send the emails from an external function, asynchronously, based on a stack of AWS S3 + Lambda + SES.
By sending emails asynchronously, the application can manage to send thousands of emails, yet the response to the user who triggered the action will not be affected. However, to ensure that the user is not waiting for the email to arrive in the inbox, we also decided to split emails into two groups, priority and non-priority, and send only the non-priority emails asynchronously. We provided an implementation for WordPress, which is rather hacky due to the limitations of function wp_mail for sending emails.
A lesson from this article is that serverless functionalities on a server-based application work pretty well: sites running on a CMS like WordPress can improve their performance by implementing only specific features on the cloud, and avoid a great deal of complexity that comes from migrating highly dynamic sites to a fully serverless architecture.
Further Reading
- The Growing Need For Effective Password Management
- The Safest Way To Hide Your API Keys When Using React
- The Path To Awesome CSS Easing With The linear() Function
- Building Gatsby Themes For WordPress-Powered Websites


