How Should Designers Learn To Code? Git, HTML/CSS, Engineering Principles (Part 2)

Email Newsletter
Weekly tips on front-end & UX.
Trusted by 200,000+ folks.

 Register!

 Flexible CMS. Headless & API 1st
Literally, tomes have been written on version control. Nevertheless, I will start by sharing a brief explanation and other introductory content to whet your appetite for further study.
Version control (not to be confused with version history) is basically a way for people to collaborate in their own environments on a single project, with a single main source of truth (often called the “master” branch).
I’ll go over today is the bare minimum you’ll need to know in order to download a project, make a change, and then send it to master.
There are many types of version control software and many tools for managing and hosting your source code (you may have heard of GitLab or Bitbucket). Git and GitHub are one of the more common pairs, my examples will reference GitHub but the principles will apply to most other source code managers.
Aside:
- For a more comprehensive and technical introduction, see Tobias Gunther’s article.
- If you prefer a more hands-on approach, GitHub has an excellent step-by-step guide.
Collecting Data, The Powerful Way
Did you know that CSS can be used for collecting statistics? Indeed, there's even a CSS-only approach for tracking UI interactions using Google Analytics. Read a related article →
Your First Contribution
Before doing these steps, you’ll need a few things set up:
- A GitHub account,
- Node and NPM installed on your computer,
- A high tolerance for pain or a low threshold for asking others for help.
Step 1: Fork (Get A Copy Of The Code On Your GitHub Account)
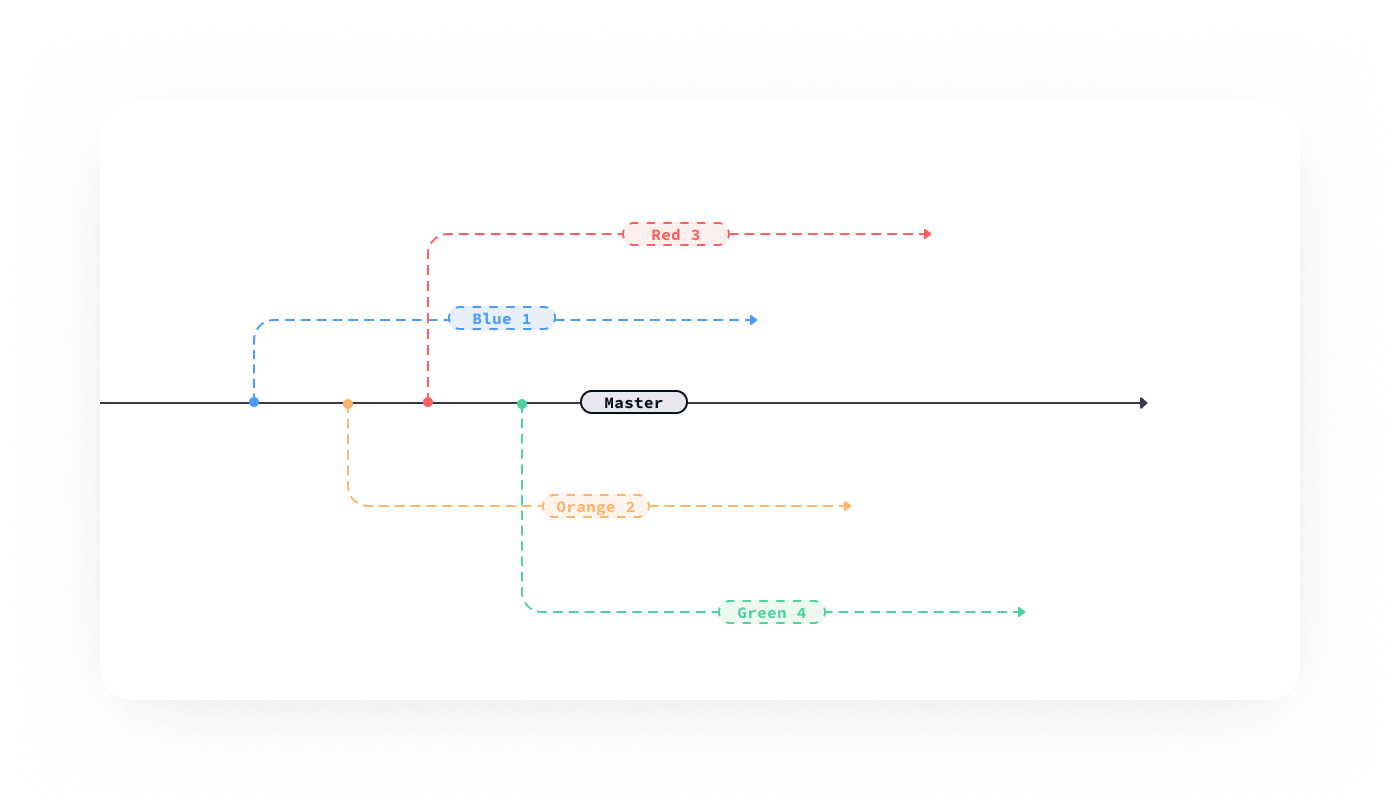
On GitHub, you will fork (fork = create a copy of the code in your account; in the following illustration, the blue, orange, red, and green lines show forks) the repository (repo) in question.
You do this by navigating to the repo in GitHub and clicking the “Fork” button, currently at the top right-hand corner of a repo. This will be the “origin” — your fork on your GitHub account.
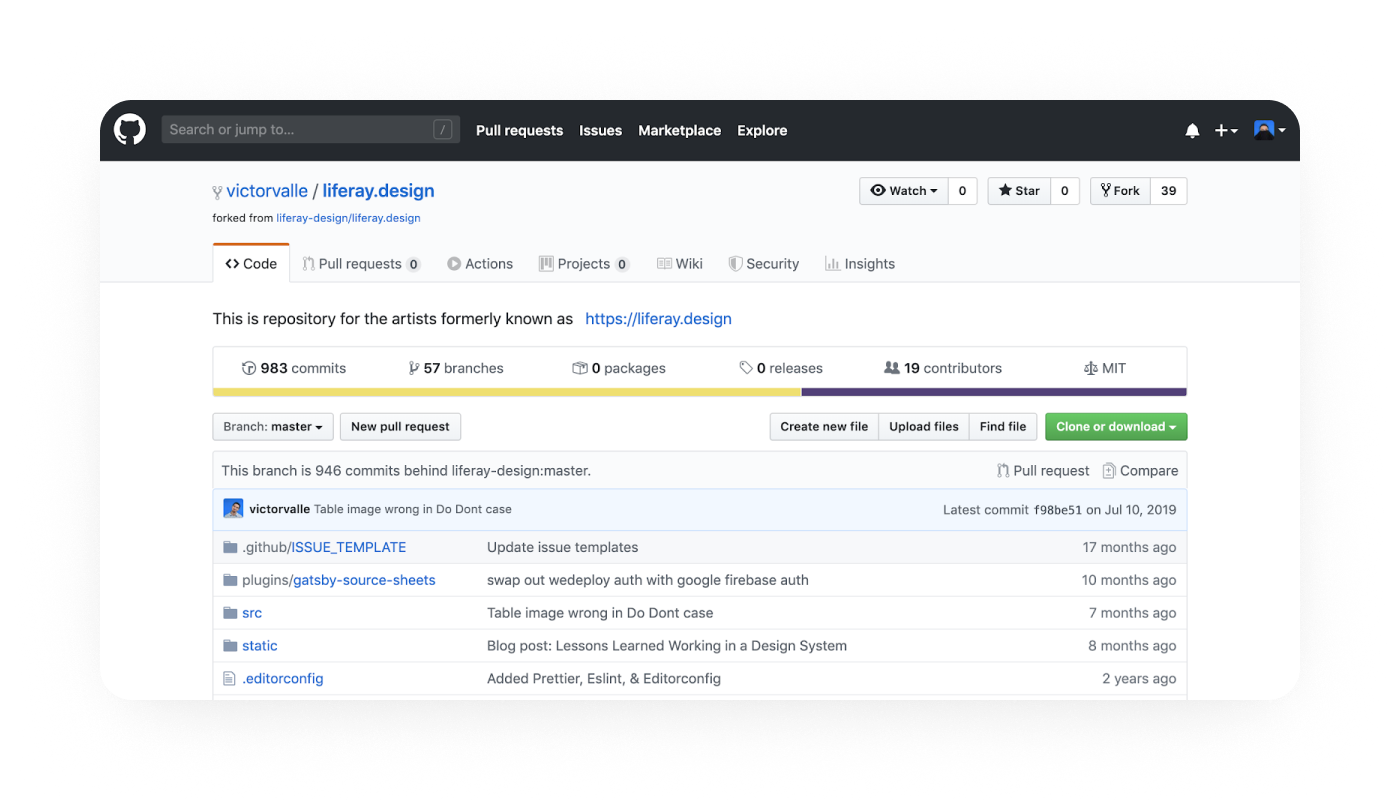
As an example, navigating to https://github.com/yourGitHubUsername/liferay.design should show your fork of the Liferay.Design repo.
Step 2: Clone (Download The Code To Your Computer)
In your terminal, navigate to where you’d like to store the code. Personally, I have a /github folder in my /user folder — it makes it easier for me to organize it this way. If you’d like to do that, here are the steps — after typing these commands into your terminal window, press the ↵ key to execute:
cd ~/             ## you'll usually start in your root directory, but just in case you don't this will take you there
mkdir github      ## this creates a "github" folder — on OSX it will now be located at users/your-username/github
cd github         ## this command navigates you inside the github folder
Now that you’re in the /github folder, you will clone (download a copy of the code onto your computer) the repo.
clone https://github.com/yourGitHubUsername/liferay.designOnce you enter this command, you’ll see a bunch of activity in the terminal — something like this:
Cloning into 'liferay.design'...
remote: Enumerating objects: 380, done.
remote: Total 380 (delta 0), reused 0 (delta 0), pack-reused 380
Receiving objects: 100% (380/380), 789.24 KiB | 2.78 MiB/s, done.
Resolving deltas: 100% (189/189), done.
Step 3: Install (Get It Running On Your Machine)
Navigate into the /project folder. In this case, we’ll enter cd liferay.design. Most projects will include a README.md file in the /root folder, this is typically the starting place for installing and running the project. For our purposes, to install, enter npm install. Once it’s installed, enter npm run dev.
Congratulations! You now have the site available on your local computer — typically projects will tell you where it’s running. In this case, open up a browser and go to localhost:7777.
Step 4: Commit (Make Some Changes And Save Them)
A commit is a collection of changes that you make; I’ve heard it described as saving your progress in a game. There are many opinions on how commits should be structured: mine is that you should create a commit when you’ve achieved one thing, and if you were to remove the commit, it wouldn’t completely break the project (within reason).
If you aren’t coming to a repo with a change in mind, a good place to go is the ‘Issues’ tab. This is where you can see what needs to be done in the project.
If you do have an idea for some change, go ahead and make it. Once you’ve saved the file(s), here are the steps required to create a commit:
git status                                         ## this will print out a list of files that you've made changes in
git add path/to/folder/or/file.ext                 ## this will add the file or folder to the commit
git commit -m 'Summarize the changes you've made' ## this command creates a commit and a commit messageTip: The best recommendation I’ve ever seen for commit messages is from Chris Breams’s “How To Write A Git Commit Message”. A properly formed Git commit subject line should always be able to complete the following sentence: “If applied, this commit will [your subject line here].” For more info on commits, check “Why I Create Atomic Commits In Git” by Clarice Bouwer.
Step 5: Push (Send Your Changes To Your Origin)
Once you’ve made some changes on your computer, before they can be merged into the master branch (added to the project), they need to be moved from your local to your remote repo. To do this, enter git push origin in the command line.
Step 6: Pull Request (Ask For Your Changes To Be Merged Into Upstream)
Now that your changes have gone from your fingers to your computer, to your remote repository — it’s now time to ask for them to be merged into the project via a pull request (PR).
The easiest way to do this is by going to your repo’s page in GitHub. There will be a small message right above the file window that says “This branch is X commits ahead repo-name:branch” and then options to “Pull request” or “Compare”.
Clicking the “Pull request” option here will take you to a page where you can compare the changes and a button that says “Create pull request” will then take you to the “Open a pull request” page where you’ll add a title and include a comment. Being brief, but detailed enough in the comment, will help project maintainers understand your proposed changes.
There are CLI tools like Node GH (GitHub also recently released a beta of their CLI tool) that allow you to initiate and manage pull requests in the terminal. At this point you may prefer to use the web interface, and that’s great! So do I.
Bonus Step: Remote (Link All The Repos)
At this point, we have three repository references:
upstream: the main repo that you’re tracking, often it’s the repo that you forked;origin: the default name of the remote that you clone;local: the code that is currently on your computer.
So far, you have #2 and #3 — but #1 is important because it’s the primary source. Keeping these three things in-line with each other is going to help the commit history stay clean. This helps project maintainers as it eliminates (or at least minimizes) merge conflicts when you send pull requests (PR’s) and it helps you get the latest code and keep your local and origin repositories up-to-date.
Set An Upstream Remote
To track the upstream remote, in your terminal enter the following:
git remote add upstream https://github.com/liferay-design/liferay.designNow, check to see what remotes you have available — enter git remote -v into your terminal, you should see something like:
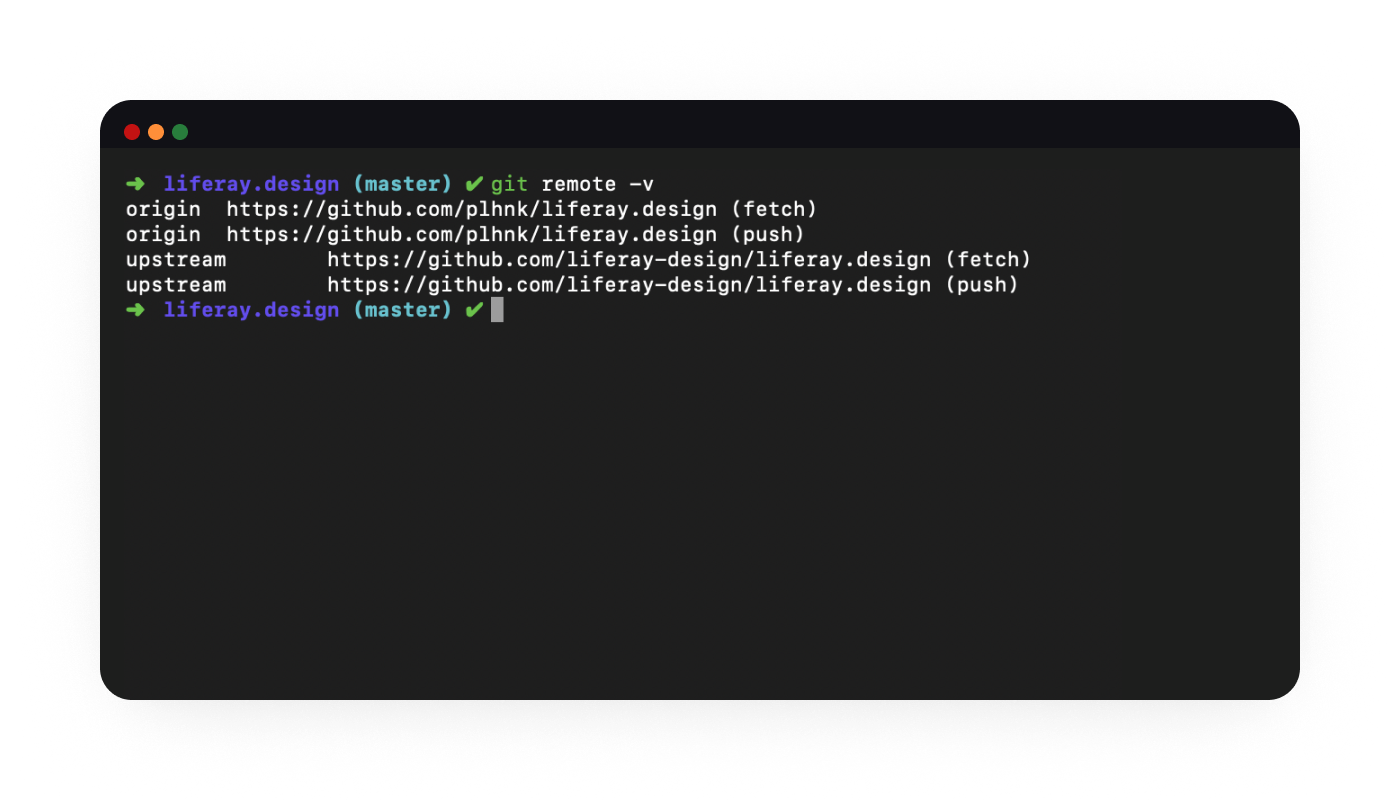
origin and upstream are the most common labels for remotes — ‘origin’ is your fork, ‘upstream’ is the source. (Large preview)origin https://github.com/yourGitHubUsername/liferay.design (fetch)
origin https://github.com/yourGitHubUsername/liferay.design (push)
upstream https://github.com/liferay-design/liferay.design (fetch)
upstream https://github.com/liferay-design/liferay.design (push)This will allow you to quickly get the latest version of what is upstream — if you haven’t worked in a repo in a long time and don’t have any local changes that you want to keep, this is a handy command that I use:
git pull upstream master && git reset --hard upstream/masterGitHub Help is a great resource for this and many other questions you might have.
HTML And CSS: Starting With Semantics
On the web, there is an endless supply of resources for learning HTML and CSS. For the purposes of this article, I’m sharing what I would recommend based on the mistakes I made how I first learned to write HTML and CSS.
What Are HTML And CSS?
Before we get any further, let’s define HTML and CSS.
HTML stands for HyperText Markup Language.
Hypertext:
“Hypertext is text displayed on a computer display or other electronic devices with references (hyperlinks) to other text that the reader can immediately access.”
— “Hypertext” on Wikipedia
Markup Language:
“…a system for annotating a document in a way that is syntactically distinguishable from the text.”
— “Markup Language” on Wikipedia
In case you also don’t know what a lot of those words mean — briefly put, HTML is the combination of references (links) between documents on the web, and tags that you use to give structure to those documents.
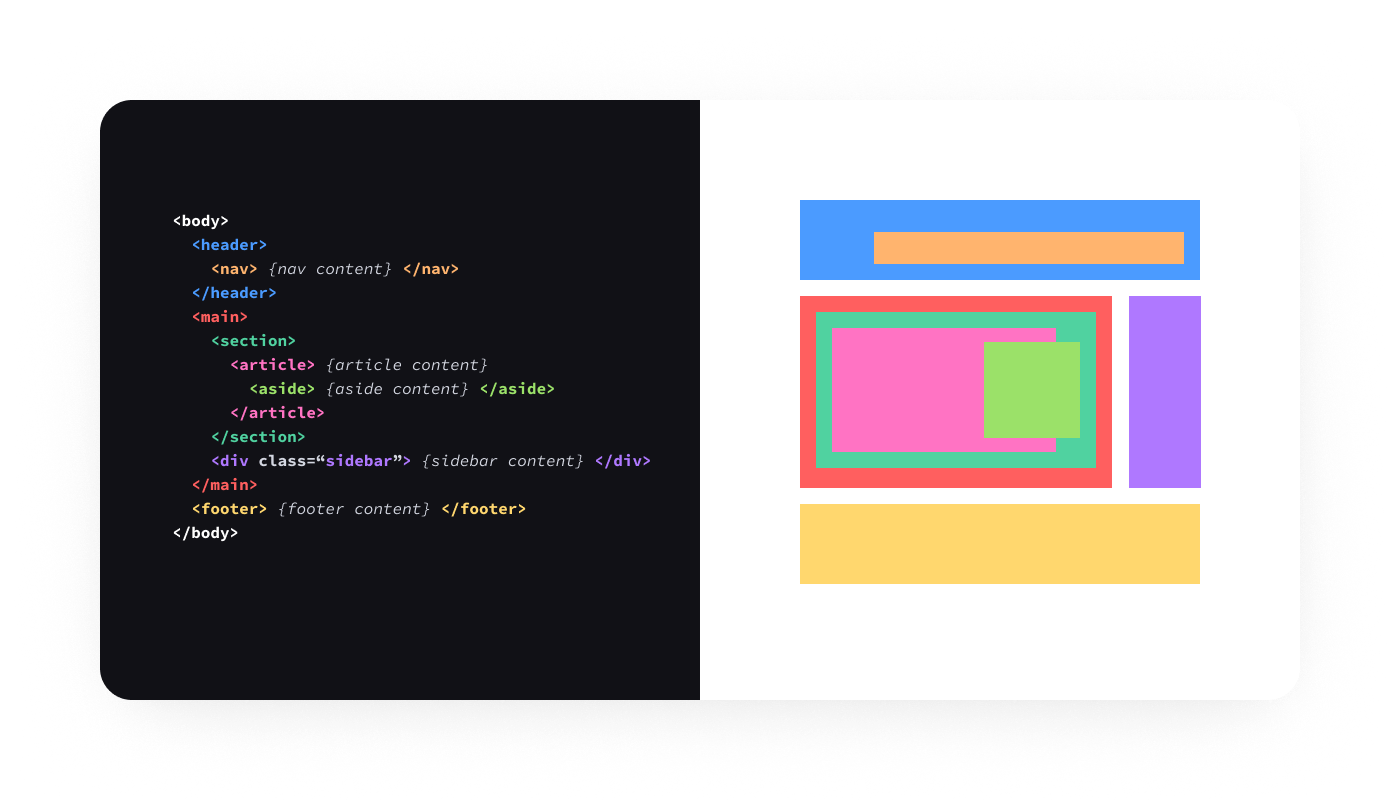
div! (Large preview)For a thorough introduction to HTML and CSS, I highly recommend the Introduction to HTML and CSS first steps, both on the Mozilla Developer Network (MDN) web docs. That, along with the excellent articles that websites such as CSS Tricks, 24 Ways and countless of others provide, contain basically everything you’ll ever need to reference with regards to HTML/CSS.
There are two main parts of an HTML document: the <head> and the <body>.
- The <head> contains things that aren’t displayed by the browser — metadata and links to imported stylesheets and scripts.
- The <body> contains the actual content that will be rendered by the browser. To render the content, the browser reads the HTML, provides a base layer of styles depending on the types of tags used, adds additional layers of styles provided by the website itself (the styles are included in/referenced from the <head>, or are inline), and that is what we see in the end. (Note: There is often also the additional layer of JavaScript but it’s outside of the scope of this article.)
CSS stands for Cascading Style Sheets — it is used to extend the HTML by making it easier to give documents a custom look and feel. A style sheet is a document that tells the HTML what elements should look like (and how they should be positioned) by setting rules based on tags, classes, IDs, and other selectors. Cascading refers to the method for determining which rules in a sheet take priority in the inevitable event of a rule conflict.
“‘Cascading’ means that styles can fall (or cascade) from one style sheet to another, enabling multiple style sheets to be used on one HTML document.”
— Cascade — Max Design
CSS often gets a bad reputation — in sites with lots of style sheets it can quickly become unwieldy, especially if there aren’t documented, consistent methods used (more on that later) — but if you use it in an organized fashion and following all the best practices, CSS can be your best friend. Especially with the layout capabilities that are now available in most modern browsers, CSS is not nearly as necessary to hack and fight as it once was.
Rachel Andrew wrote a great guide, How To Learn CSS — and one of the best things to know before you start is that:
“You don’t need to commit to memorizing every CSS Property and Value.”
— Rachel Andrew
Instead, it’s far more vital to learn the fundamentals — selectors, inheritance, the box model, and most importantly, how to debug your CSS code (hint: you will need the browser developer tools).
Don’t worry about memorizing the syntax for the background property, and don’t worry if you forget about how exactly to align stuff in Flexbox (the CSS Tricks Guide to Flexbox is possibly one of my top-10 most visited pages, ever!); Google and Stack Overflow are your friends when it comes to CSS properties and values.
Some code editors even have built-in autocomplete so you don’t even need to search on the web in order to be able to figure out all the possible properties of a border, for example.
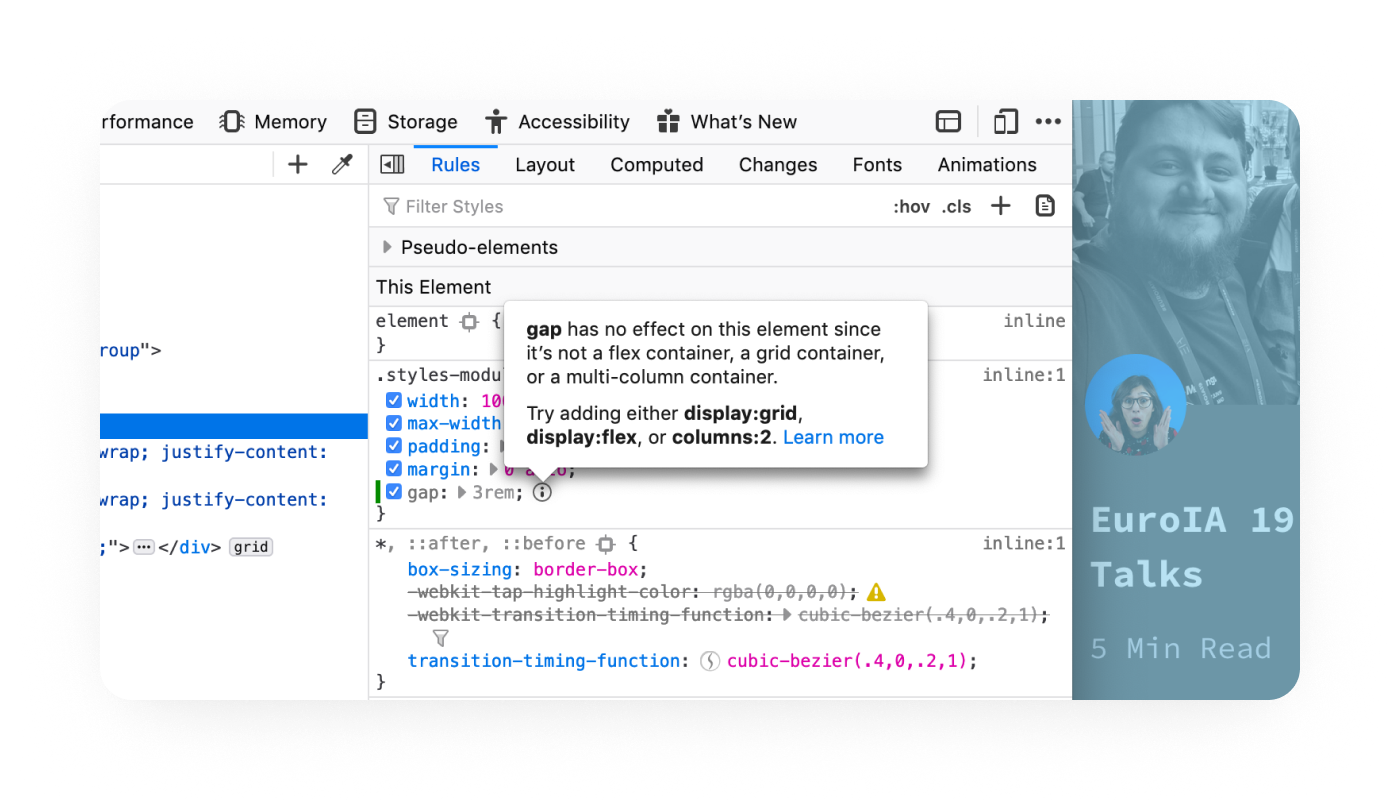
One of my favorite new features in Firefox 70 is the inactive CSS rules indicator. It will save you hours of time trying to figure out why a style isn’t being applied.
Semantics
Let’s start with semantic code. Semantics refers to the meanings of words, semantic code refers to the idea that there is meaning to the markup in any given language.
There are many reasons why semantics are important. If I could summarize this, I would say that if you learn and use semantic code, it will make your life a lot easier because you will get a lot of things for free — and who doesn’t like free stuff?
For a more complete introduction to semantic code, see Paul Boag’s brief blog post on the topic.
Semantics gives you many benefits:
- Default styles
For example, using a headline tag<h1>for the title of your document will make it stand out from the rest of the document’s contents, much like a headline would. - Accessible content
Your code will be accessible by default, meaning it will work with screen readers and will be easier to navigate with a keyboard. - SEO benefits
Semantic markup is easier for a machine to read, which makes it more accessible to search engines. - Performance benefits
Clean HTML is the foundation for a high-performing site. And clean HTML will also likely lead to cleaner CSS which means less code overall, making your site or app faster.
Note: For a more in-depth look into semantics and HTML, Heydon Pickering wrote “Structural Semantics: The Importance Of HTML5 Sectioning Elements” which I highly recommend reading.
Engineering Principles And Paradigms: The Basics
Abstraction
There are tons of applications, tangents, and levels we could explore over the concept of abstraction — too many for this article which is intended to give you a brief introduction into concepts so that you are aware of them as you continue to learn.
Abstraction is a foundational engineering paradigm with a wide variety of applications — for the purposes of this article, abstraction is separating form from function. We’ll apply this in three areas: tokens, components, and the Don’t Repeat Yourself principle.
Tokens
If you’ve used a modern design tool for any length of time, you’ve probably encountered the idea of a token. Even Photoshop and Illustrator now have this idea of shared styles in a centralized library — instead of hard-coding values into a design, you use a token. If you’re familiar with the concept of CSS or SASS variables, you’re already familiar with tokens.
One layer of abstraction with tokens is to assign a name to a color — for example, $blue-00 can be mapped to a hex value (or an HSL value, or whatever you want) — let’s say #0B5FFF. Now, instead of using the hex value in your stylesheets, you use the token value — that way if you decide that blue-00 is actually #0B36CE, then you only have to change it in a single place. This is a nice concept.
If you take this same paradigm of abstraction and go a layer further, you can token-ception — and assign a variable to a functional value. This is particularly useful if you have a robust system and want to have different themes within the system. A functional example of this would be assigning a variable like $primary-color and map that to $blue-00 — so now you can create markup and instead of referencing blue, you’re referencing a functional variable. If you ever want to use the same markup, but with a different style (theme), then you only need to map $primary-color to a new color, and your markup doesn’t need to change at all! Magic!
Components
In the past 3-4 years, the idea of components and componentization has become more relevant and accessible to designers. The concept of symbols (pioneered by Macromedia/Adobe Fireworks, later expanded by Sketch, and then taken to the next level by Figma and Framer), is now more widely available in most design tools (Adobe XD, InVision Studio, Webflow, and many others). Componentization, even more than tokens, can separate the form of something from the function of it — which helps to improve both the form and the function.
One of the more notable early examples is Nicole Sullivan’s media object component. At first glance you might not realize that a whole page is essentially composed of a single component, rendered in different ways. In this way, we can re-use the same markup (form), modifying it slightly by passing in options or parameters, and styles — and have it provide a variety of value (function).
Don’t Repeat Yourself
DRY (Don’t Repeat Yourself) is one of my favorite principles — creating things that can be reused over and over is one of the small victories you can have when coding.
While you often can’t (and arguably shouldn’t) strive to apply the DRY principle 100% of the time, every time — it’s at least beneficial to be aware of this so that as you’re working, you can consider how you can make whatever you’re working on more reusable.
A note on the Rule of Three: A corollary to the DRY principle is the rule of three — essentially, once you re-use (copy/paste) something three times, you should rewrite it into a reusable component. Like the Pirate’s Code, it’s more of a guideline than a hard and fast rule, and can vary from component to component and from project to project.
CSS And Styling Methodologies: Atomic vs. BEM
There are a lot of different ways to organize and write CSS code — Atomic and BEM are only two of the many that you’re likely to come across. You don’t have to “pick” a single one, nor do you have to follow them exactly. Most of the teams I’ve worked with usually have their own unique blend, based on the project or technology. It is helpful to be familiar with them so that over time, you can learn which approach to take depending on the situation.
All of these approaches go beyond “just” CSS and styling, and can often influence the tooling you use, the way you organize your files, and potentially the markup.
Atomic CSS
Not to be confused with Atomic Web Design — atomic (perhaps more aptly referred to as “functional”) CSS, is a methodology that essentially favors using small, single-purpose classes to define visual functions. A few notable libraries:
What I like about this method is that it allows you to quickly style and theme things — one of the biggest drawbacks is that your markup can get pretty cluttered, pretty fast.
Check John Polacek’s article on CSS-tricks for a full introduction to Atomic CSS.
BEM
The BEM philosophy is a great precursor to a lot of the modern JavaScript frameworks like Angular, React, and Vue.
“BEM (Block, Element, Modifier) is a component-based approach to web development.”
— BEM: Quick Start
Basically, everything that can be reused is a block. Blocks are comprised of elements, something that can’t be used outside of a block, and potentially other blocks. Modifiers are things that describe the status of something or the way it looks or behaves.
Personally, I like the theory and philosophy of BEM. What I do not like is the way that things are named. Way too many underscores, hyphens, and it can feel unnecessarily repetitive (.menu, .menu__item, etc).
Recommended reading: BEM For Beginners written by Inna Belaya
Thank U, Next(.js)
After you have sufficiently mastered these topics, don’t worry, there is still plenty to learn. Some suggestions:
- Functional and object-oriented programming
We touched on it lightly, but there’s plenty more to learn beyond CSS. - Higher-level languages and frameworks
Typescript, Ruby, React, Vue are the next things you’ll tackle once you have a strong grasp of HTML and CSS. - Querying languages and using data
Learning about GraphQL, MySQL, REST APIs will take your coding ability to the next level.
Conclusion: Designers Who Code != Software Engineers
Hopefully, this article has shown you that learning to code isn’t as difficult as you may have previously thought. It can take a lot of time, but the amount of resources available on the internet is astounding, and they’re not decreasing — quite the opposite!
One significant point that I want to emphasize is that “coding” is not the same as “software engineering” — being able to fork a repo and copy/paste in code from Stack Overflow can get you a long way, and while most, if not all, software engineers that I know have done that — you must use your new-found skills with wisdom and humility. For everything you can now access with some engineering prowess, there is that much more that you don’t know. While you may think that a feature or style is easy to accomplish because — “Hey, I got it working in devtools!” or “I made it work in Codepen.” — there are many engineering processes, dependencies, and methods that you probably don’t know that you don’t know.
All of that is to say — don’t forget that we are still designers. Our primary function is to add business value through the lens of understanding customer or user problems and synthesizing them with our knowledge of design patterns, methods, and processes. Yes, being a “designer who writes code” can be very useful and will expand your ability to add this value — but we still need to let engineers make the engineering decisions.
Anything Amiss?
There’s a good chance that something in this post was obscure, obtuse, and/or obsolete and I’d love the opportunity to make it better! Please leave a comment below, DM me, or @mention me on Twitter so I can improve.
Further Reading
- Coding Bootcamps vs. Computer Science Degrees: What Employers Want and Other Perspectives (Kyle Thayer)
- How To Start Using Sketch And Framer X (by Martina Pérez, Smashing Magazine)
- Introduction To Linux Commands (by Paul Tero, Smashing Magazine)
- Become A Command-Line Power User With Oh My ZSH And Z (by Wes Bos, Smashing Magazine)
- A list of the common cmd.exe and Unix commands that you can use in PowerShell (Microsoft Docs)
- regular-expressions.info (by Jan Goyvaerts)
- regexone.com (learn regular expressions with simple interactive exercises)
- Batch Resizing Using Command Line and ImageMagick (by Vlad Gerasimov, Smashing Magazine)
- Shortcuts And Tips For Improving Your Productivity With Sublime Text (by Jai Pandya, Smashing Magazine)
- Visual Studio Code Can Do That? (by Burke Holland, Smashing Magazine)
- Why version history is not version control (by Josh Brewer)
- Modern Version Control With Git (by Tobias Günther, Smashing Magazine)
- “Hello World” (a GitHub step-by-step guide)
- How to Install Node.js and NPM on a Mac (by Dave McFarland)
- How to Install Node.js and NPM on Windows (by Dejan Tucakov)
- Why I Create Atomic Commits In Git (by Clarice Bouwer)
- How to Write a Git Commit Message (by Chris Breams)
- Semantic code: What? Why? How? (by Paul Boag)
- Structural Semantics: The Importance Of HTML5 Sectioning Elements (by Heydon Pickering, Smashing Magazine)
- Designing for Performance: Chapter 4. Optimizing Markup and Styles (by Lara C. Hogan, O’Reilly Media)
- The media object saves hundreds of lines of code (by Nicole Sullivan)
- Let’s Define Exactly What Atomic CSS is (by John Polacek, CSS Tricks)
- BEM For Beginners: Why You Need BEM (by Inna Belaya, Smashing Magazine)
- Javascript for Cats: An Introduction for New Programmers
- Roadmap.sh: Frontend Developer
- Functional Programming vs OOPS : Explain Like I’m Five
- Why, How, and When to Use Semantic HTML and ARIA (by Adam Silver, CSS Tricks)
- HTML Semantics (an eBook by Smashing Magazine)
- The Fundamentals - HTML + CSS (on Syntax.fm)
- Cascade and inheritance (westciv.com)
- CSS Tricks (by Chris Coyier)
- Getting Started With CSS Layout (by Rachel Andrew, Smashing Magazine)
- Introduction to HTML (MDN web docs)
- CSS first steps (MDN web docs)
- JavaScript First Steps (MDN web docs)
- 24 Ways (by Drew McLellan)


