Using Grommet In React Applications

Email Newsletter
Weekly tips on front-end & UX.
Trusted by 200,000+ folks.
 Flexible CMS. Headless & API 1st
 Register!


Over the years, the React ecosystem has grown with the invention of libraries that help the development of React applications. In this tutorial, we are going to learn to use Grommet for developing responsive, accessible, and mobile-first components for React applications. We’ll take a closer look at its core concepts, some of its use cases, and build a simple example. It’s important to note that Grommet is open-source with 6.9k stars on GitHub.
This tutorial will be beneficial to readers who are interested in developing responsive components in their React application using Grommet. This article requires a basic understanding of React and Styled-components.
What Is Grommet?
Grommet is a React component library that boasts of responsive and accessible mobile-first code components. It does this through its components — which are the building blocks for the library. They include Layouts, Types, Colors, Controls, Inputs, Visualizations Media and utilities. All grommet components are inbuilt with accessibility and responsiveness in mind.
Grommet provides support for W3C’s spec which makes it score a huge point in terms of accessibility. It also provides powerful themes and tools that allow you to customize your color, type, component elements and layout needs according to your project needs.
Some popular alternatives to Grommet include tailwindcss and styled components, although very popular among developers, each framework differ in approach in building applications. Grommet is mobile-first, accessible, responsive and themes out of the box and has support for W3C for easy creation of React applications while Tailwind CSS is a highly customizable and utility framework that allows developers to build applications without the restrictions of CSS such as its cascading rules. Styled-components aim to help developers write reusable React components by allowing us to write CSS code in our JavaScript using object literals and it also uses components as low-level styling construct.
In our project, we will be using Grommet in our projects due to its customizable components, accessibility, and theme properties which we’d need as we go forward in this tutorial.
Using Grommet Components
Grommet like so many other component libraries comes pre-built with some components for layouts and themes such as Box, Card and Header components. To use first you’d need to install the grommet package using NPM or yarn, like the code block below.
npm i grommet styled-componentsOr:
yarn add grommet styled-componentsFrom the above, you can see that we also installed styled-components. This is because Grommet uses styled-components for customizing styles in components; it’s advisable to install styled-components in your projects.
To use a Grommet component in a React project, you need to import grommet. Let’s build a card component below to explain:
import React from 'react';
import { Grommet, Card } from 'grommet';

export default function GrommetExample() {
  return (
     <Card>
        <CardBody pad="medium">Body</CardBody>
          <Button
            icon={<Icons.Favorite color="red" />}
              hoverIndicator
            />
        </Card>
      );
    }
In the code block above, first imported Grommet and the Card component from grommet package into your file, next we wrapped our component using the Card component we’ve imported. Styles can be added to a Grommet component as objects like we did to the Button or they can be styled using styled-components.
Let’s see more examples of Grommet components by looking at Form components.
Why Grommet?
Grommet’s primary purpose is to improve the experience of developers and make for a faster way of building React applications with its mobile-first, accessible, and responsive components. Grommet seamlessly aligns a design and a developer workflow to create a seamless experience, making it very easy for anyone to get started with.
Grommet also provides support for screen readers out of the box, theme variants such as dark-mode are gotten from grommet out of the box and they can be set up using the themeMode prop in a React application, like below.
import React from "react";
import { Grommet, Box, Button, Heading, dark } from "grommet";
import { grommet } from "grommet";
const App = () => {
  const [darkMode, setDarkMode] = React.useState(false);
  return (
    <Grommet full theme={grommet} themeMode={darkMode ? "dark" : "light"}>
      <Box pad="large">
        <Heading level="1">Grommet Darkmode toggle</Heading>
        <Button
          label="Toggle Theme"
          primary
          alignSelf="center"
          margin="large"
          onClick={() => setDarkMode(!darkMode)}
        />
      </Box>
    </Grommet>
  );
};
export default App;
In the code block above, we are using the themeMode property to add a dark mode. Using a ternary operator, we check if the page is on dark mode, we can toggle it to light mode, next we added a button for toggling between the light and dark mode on our application, you can check here for a demo on Codesandbox.
Grommet can also exist with other frameworks and doesn’t add a global style that will affect existing components in your React application, functions and styles can be interpolated into an object literal for styles. Grommet also features Layout components, which features some CSS properties such as flexbox, it also takes in all flexbox properties as props.
Grommet features a big library of SVG icons that are accessible using the <Icon /> component, unlike many other frameworks. Grommet features components for data visualization such as bar charts, maps and even progress trackers.
Several firms use Grommet today to create real-world applications, including Netflix, IBM, Sony, Samsung, Shopify, GitHub and Twilio.
Building A Pricing Component With Grommet
Now we know the basics and core concepts of Grommet, we are going to create a pricing component using Grommet components, it should feature components such as Card, Box and Buttons from the Grommet library.
Without further ado, let’s start!
Setting Up Your Environment
First, let’s create a bare React application, write the code block below on your terminal.
create-react-app grommet-appThe above code will create a bare React application using the create-react-app package. Move into the project directory.
cd grommet-appNext is to install the dependencies we’d need in our project.
yarn add grommet styled-componentsIf you’ve done this, then start the project server using the command below.
yarn startFor this project, we’d need a single component for our cards and style with styled-components.
Let’s create the first card below
import React from "react";
import styled from "styled-components";

export default function GrommetCard() {
  return (
    <>
       <CardWrapper>
        <Card left>
          <Div>
            <Div>
              <CardContent>
                <small>Basic</small>
                <h1>$588</h1>
              </CardContent>
              <CardContent>
                <p>500 GB storage</p>
              </CardContent>
              <CardContent>
                <p>2 Users Allowed</p>
              </CardContent>
              <CardContent>
                <p>Send Up To 3 GB</p>
              </CardContent>
            </Div>
            <CardButton secondary>LEARN MORE</CardButton>
          </Div>
        </Card>
   </CardWrapper>
    </>
  );
}
In the code block above, we are using the component CardWrapper to wrap all of our Card components, next we added a new component, CardContent which is used to wrap all of our content in each card component. The CardButton component is a button component that is used on cards on Grommet.
Next, let’s create styles for our application using styled-components. Write the file below:
const primaryGradient = "linear-gradient(hsl(236, 72%, 79%), hsl(237, 63%, 64%))";

const CardWrapper = styled.div`
  display: flex;
  justify-content: center;
  align-items: center;
  height: max-content;
  margin: 20px;
  @media all and (max-width: 1240px) {
    flex-direction: column;
  }
`;
In the above, we defined a style object for our CardWrapper in our application. Let’s add style objects for our Card component above.
const Card = styled.div`
  min-width: 380px;
  box-shadow: 3px -2px 19px 0px rgba(50, 50, 50, 0.51);
  border-radius: ${(props) => (props.left ? " 6px 0 0 6px" : props.right ? "0 6px 6px 0" : "6px")};
  background: ${(props) => (props.secondary === undefined ? "#fff" : primaryGradient)};
  padding: 25px 20px;
  height: ${(props) => (props.center ? "520px" : "480px")};
  display: flex;
  justify-content: center;
  align-items: center;
  @media all and (max-width: 1240px) {
    margin-bottom: 20px;
    border-radius: 6px;
    height: 480px;
  }
  @media all and (max-width: 420px) {
    min-width: 90%;
  }
`;
Let’s add more styles to our components.
const CardButton = styled.div`
min-width: 100%;
padding: 10px 15px;
min-height: 50px;
box-shadow: 1px 1px 0 rgba(0, 0, 0, 0.2), 0px 0px 2px rgba(0, 0, 0, 0.2);
color: ${(props) => (props.secondary !== undefined ? "#fff" : "#7c7ee3")};
background: ${(props) => (props.secondary === undefined ? "#fff" : primaryGradient)};
text-align: center;
margin-top: 25px;
display: flex;
align-items: center;
justify-content: center;
font-weight: 600;
font-size: 16px;
border-radius: 6px;
`;
const CardContent = styled.div`
width: 100%;
color: ${(props) => (props.secondary !== undefined ? "#fff" : "#000")};
padding-bottom: 10px;
margin-bottom: 10px;
border-bottom: 1.3px solid #eee;
text-align: center;
`;
const Div = styled.div`
min-width: 100%;
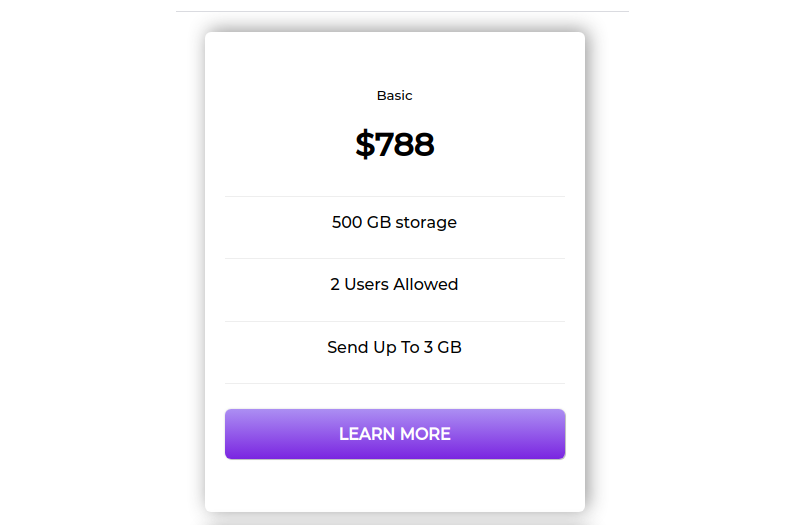
`;Once we’ve done all this, our project should look similar to the image below.
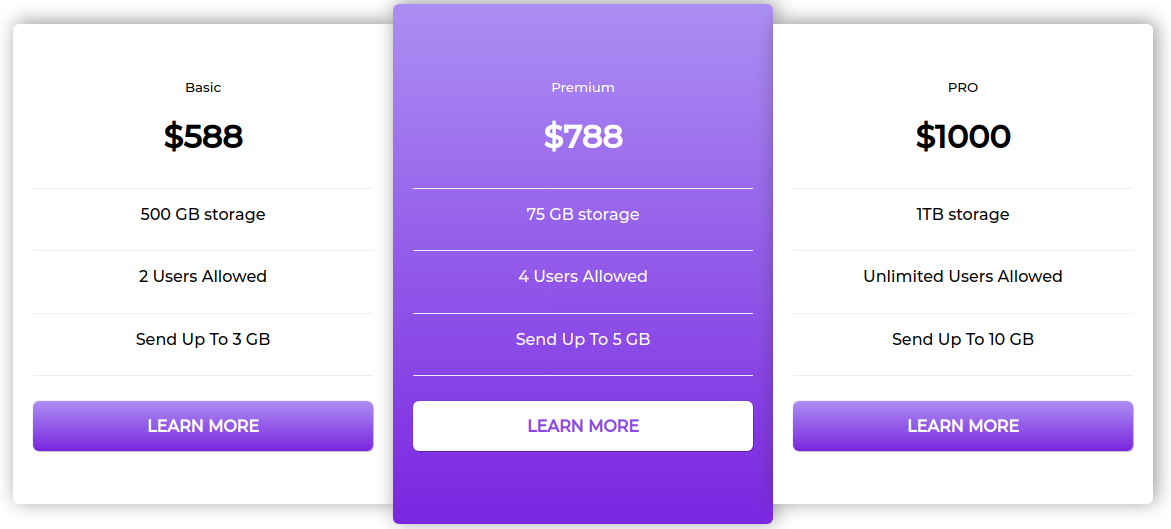
We need to add more cards to our component using the code block below.
 <Card center secondary>
         <Div>
            <Div>
              <CardContent secondary>
                <small>Premium</small>
                <h1>$788</h1>
              </CardContent>
              <CardContent secondary>
                <p>75 GB storage</p>
              </CardContent>
              <CardContent secondary>
                <p>4 Users Allowed</p>
              </CardContent>
              <CardContent secondary>
                <p>Send Up To 5 GB</p>
              </CardContent>
            </Div>
            <CardButton>LEARN MORE</CardButton>
          </Div>
        </Card>

       <Card right>
          <Div>
            <Div>
              <CardContent>
                <small>PRO</small>
                <h1>$1000</h1>
              </CardContent>
              <CardContent>
                <p>1TB storage</p>
              </CardContent>
              <CardContent>
                <p>Unlimited Users Allowed</p>
              </CardContent>
              <CardContent>
                <p>Send Up To 10 GB</p>
              </CardContent>
            </Div>
            <CardButton secondary>LEARN MORE</CardButton>
          </Div>
        </Card>
      </CardWrapper>
    </>
  );
}
Here, we created two more card components, adding our own custom components with styled-components and used the style objects we defined above to wrap our Grommet components and improve styling.
Our final price card application should look like the image below.
Using Grommet In Production (Building List App)
To see an example of what it’d look like using Grommet in another application, we are going to build a simple app that will allow a user to add, view and delete list items. We will be using in-built React Context API to manage the state of the application, Grommet for our UI components and styled-components for styling our application.
Again, let’s initialize a react app using the command below.
create-react-app list-appcd into the project directory
cd list-appyarn add grommet grommet-controls grommet-icons styled-componentsIn the above code block, we installed:
grommet | Our UI component library |
grommet-controls, grommet-icons | Icons and controls packages we need to install to work with Grommet |
styled-components | For utilizing tagged literals for styling react components and grommet |
Building The App Context
In the application we need to share the user’s data across multiple components, to achieve that we would make use of Context API. With this, we can create an App Context that would hold the lists and logic for our application. You can check out this article to learn more about Context API.
To create our app context, first create a folder called context in the src directory of our application, next create a file called AppContext.js this will be the file for all our app context, let’s do that in the code block below:
import React, { createContext, useState } from 'react';
export const Context = createContext();
const AppContext = ({children}) => {
  const [lists, setLists] = useState([]);
  const removeList = item => {
    let newLists = [...lists];

    lists.map((list, id) => {
      return list === item && newLists.splice(id, 1);
    });
    setLists(newLists);
  }
In the code block above, we imported the context API hook createContext and the useState hook all from React, using the useState component, we created a central state for our application, this was done so that the component can act as a Context Provider for other components in our application. Next, we created a new variable named removeList that takes in an item as a parameter, using the spread operator we are spreading what’s in the state and splicing out the object that’s equal to the item we want to remove.
Next, we will use the logic above to create methods for adding and deleting list items in our application, we do that in the code block below:
return (
    <Context.Provider value={{
      lists,
      addToLists: (newItem) => setLists([...lists, newItem]),
      deleteFromList: (item) => removeList(item)
    }}>
      {children}
    </Context.Provider>
  )
}
export default AppContext;
Here, we are returning the Context.Provider and accepting children props, we are doing this so that other component will be able to access the properties we pass in the value prop, we initialized the lists object to take in our lists, the addToList method takes in a newItem parameter to add new lists to our application state and the deleteFromList removes or deletes an item from the list store.
Building The List Component
In this section, we are going to build our List component using Grommet for our UI components and styled-components to style some parts of our UI. First, create a components folder inside our application src directory, then inside the components folder, create a new file List.js and inside it, write the code below.
import React from "react";
import styled from "styled-components";
import { Card, CardBody, Box, Text, Button } from "grommet";
function List(props) {
  return (
    <StyledDiv>
      <Card>
        <CardBody className="card_body">
          <Box direction="row" className="item_box">
            <Text className="text">{props.list}</Text>
            <Box className="button_box">
              <Button
                onClick={props.deleteList.bind(this, props.list)}
                className="button"
              >
                Delete
              </Button>
            </Box>
          </Box>
        </CardBody>
      </Card>
    </StyledDiv>
  );
}
export default List;
In the code above, we first imported components Card, CardBody, Box, Text and Button from grommet, next we created a List component to take in props, using Grommet components we created a card component with a delete button that will be automatically added to a list. Next is to style our component below:
const StyledDiv = styled.div`
  .button {
    background-color: #8b0000;
    color: white;
    padding: 10px;
    border-radius: 5px;
  }
  .card_body {
    padding: 20px;
    margin-top: 20px;
  }
  .item_box {
    justify-content: space-between;
  }
  .text {
    margin-top: auto;
    margin-bottom: auto;
  }
`;
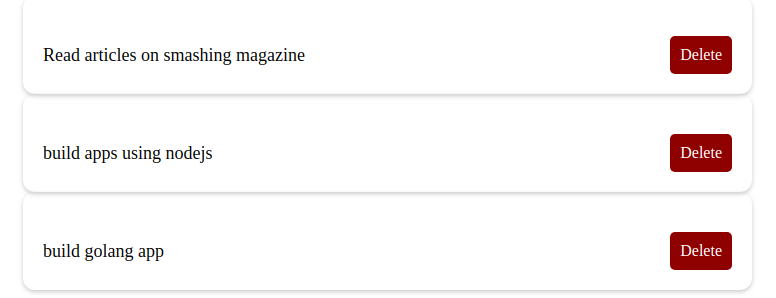
Once we do the above, our component should look like the image below.

Building The List Display Component
This component displays all the lists we’ve added and also automatically generates a delete button as soon as a new list is added.
import React from "react";
import List from "./List";
import { Context } from '../context/AppContext';
function ListDisplay() {
  return (
    <Context.Consumer>
      {(context) => (
        <div className="container">
          {context.lists.length ?
            context.lists.map((list, id) => (
              <List key={id} list={list} deleteList={context.deleteFromList} />
            )) : null
          }
        </div>
      )}
    </Context.Consumer>
  );
}
export default ListDisplay;
In this component, we created a function ListDisplay and wrapped it using the Context.Consumer from our appContext component, next using a div for our container tag, we destructured the list and deleteList methods from the app context, by doing this we can be able to pass them as props. Next, we map through the lists to return a new list, which we can use in building a single list by passing the returned object as props to the List component.
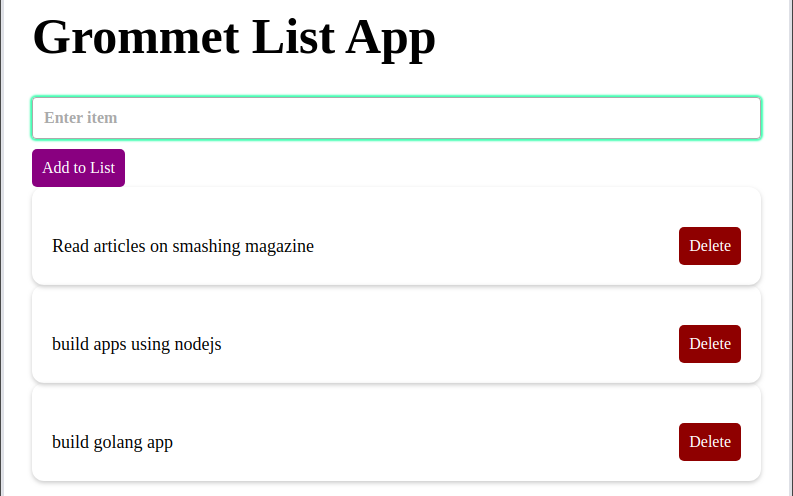
Our component should look like this with lists added:
NavBar Component
This component will be the bulk of our application, here we will wrao our component using the Context.Consumer and similar to our other components, we will be styling with styled components for styling. Let’s build this component below.
import React, { useState } from "react";
import { Heading, Form, TextInput, Button } from "grommet";
import styled from "styled-components";
import { Context } from '../context/AppContext';
function Navbar() {
  const [value, setValue] = useState("");
  return (
    <Context.Consumer>
      {store => (
        <StyledDiv className="container">
          <Heading className="title">Grommet List App</Heading>
          <Form onSubmit={() => store.addToLists(value)} className="form-group">
            <TextInput
              className="form"
              value={value}
              type="text"
              onChange={(e) => setValue(e.target.value)}
              placeholder="Enter item"
            />
            <Button type='submit' className="button">Add to List</Button>
          </Form>
        </StyledDiv>
      )}
    </Context.Consumer>
  );
}
const StyledDiv = styled.div`
  .button {
    margin-top: 10px;
    background-color: purple;
    color: white;
    padding: 10px;
    border-radius: 5px;
  }
`;
export default Navbar;
First, in order to access the properties in the application context provider, we wrapped our component in a Context.Consumer component. Next, we added a Heading tag from Grommet, and then we created an input form for adding our lists by using the method addToList which takes in a value parameter (in our case the value is the user’s input). Last but not least, we added a Submit button to handle the form submit.
Once done correctly, our app should look like this:
Conclusion
In this article, we learned about Grommet, a component library with responsiveness and accessibility in mind. We also went through the process of creating a pricing component application using Grommet and a list application. Have fun using Grommet for your component and UI needs for your next React application. The code for the Grommet list application can be found on Codesandbox and the pricing component can be found here.


